Friday, September 19, 2014

Year of Cards: June


If you've been following along with my progress on the Year of Cards gifts, you may have noticed I'm not making the cards in any particular order. I look at the Papertrey Ink Birthday Classics stamp sets I've gotten thus far and pick a month at random - whatever I'm feeling like at the moment. I had been holding off on June's edition til now just because I knew exactly what I wanted to make. (It would be quick and easy and I could hold off til I had 5 or so months already completed was my reasoning.)

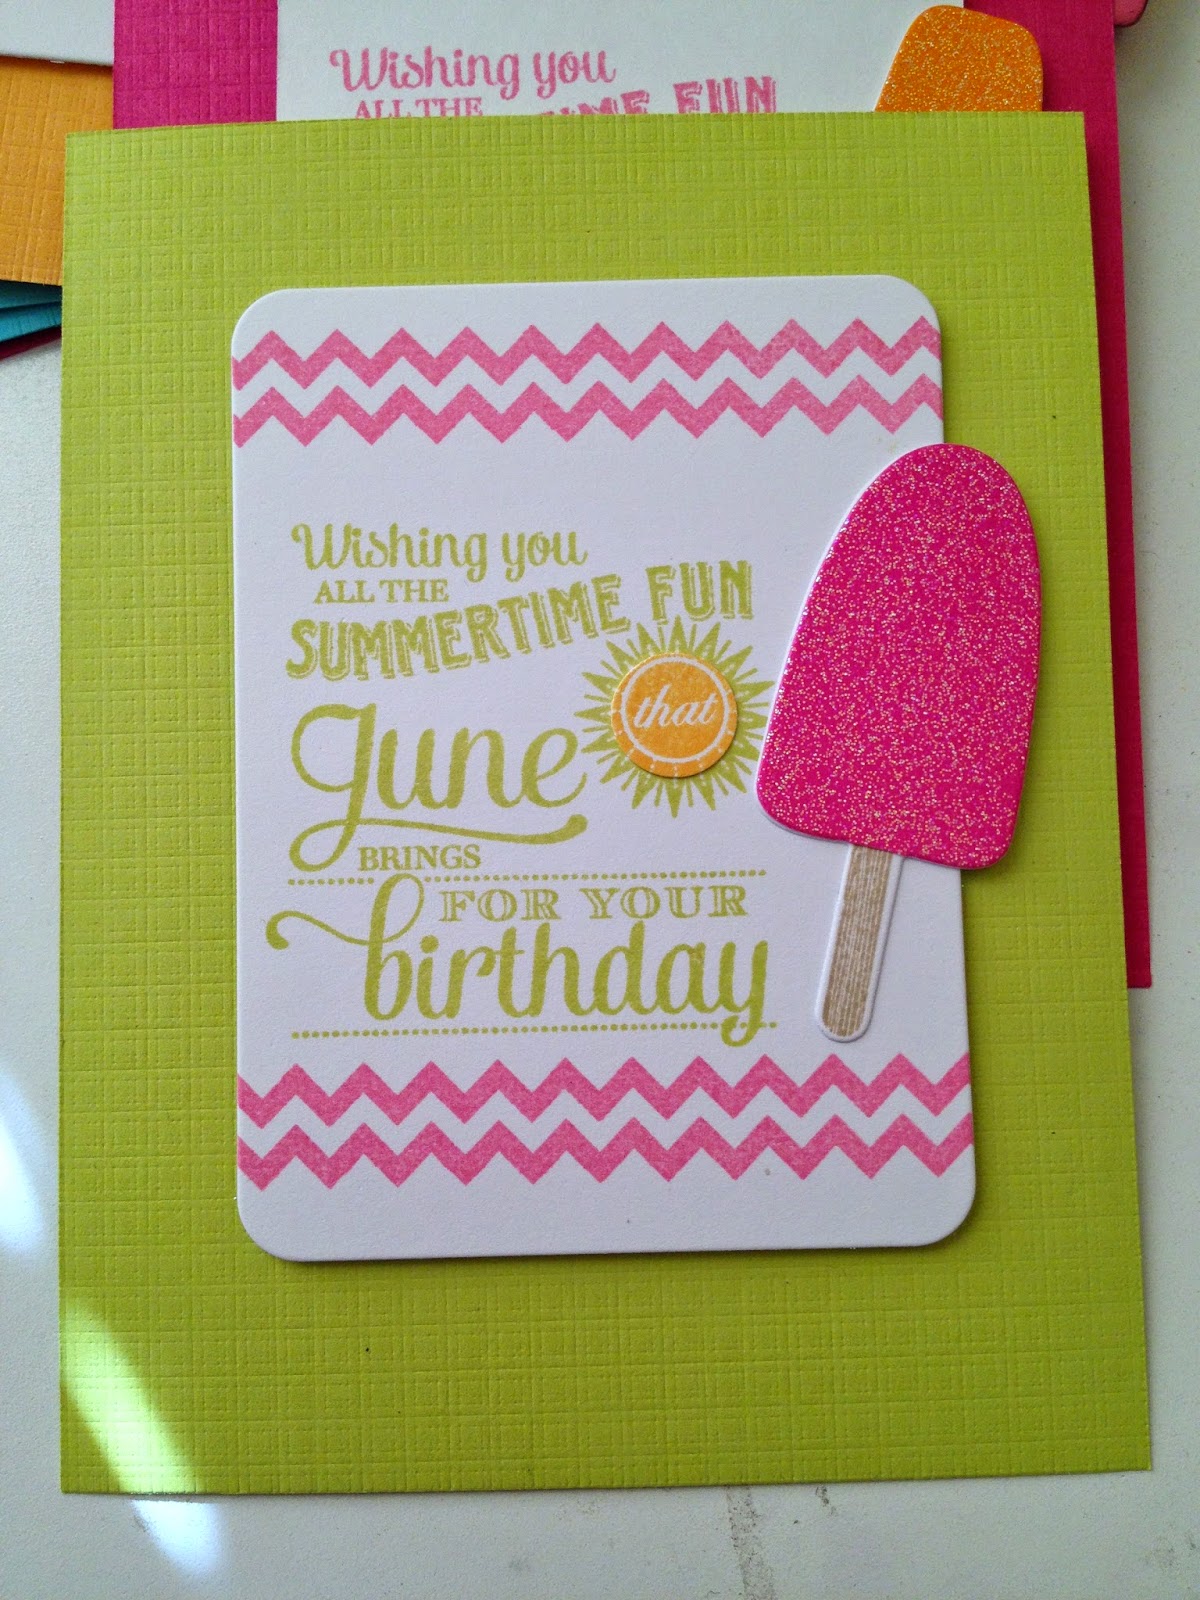
When the June set came out it was released with another stamp set called Summer Sweetness. I've used that set a lot since I got it. I just love the popsicles!

Anyway, Nichole Heady had created an adorable card with both sets as well as the Background Basics: Super Chevron set. And that's what I'm recreating here. I don't often recreate cards by others stamp for stamp, but this one was just perfect: it was simply designed, quick to execute and bright & happy.

I did make some changes - the color schemes - I wanted to try out all kinds of combos.
And I wanted to usethe Sugar Coated cardstock by Doodlebug for the popsicles. It adds a lot to the card I think.
And finally I used the Linen & Canvas Impression plate on the background cardstock. Just a nice little added detail.


Here's a pic of all the cards so you can see - none are exactly the same. I kinda like that. (Kind of like my Valentine Rak-a-rama cards - the snowflake effect - no two are the same.)

Okay - I'm moving on to May next. After that I'll probably be going in order: September through January. And finally fill the boxes with all the cards and come up with some kind of labeling. Should be fun. Stay tuned and thanks for stopping by!


Wednesday, September 17, 2014

Year of Cards: February

I've been working away at my "year of cards" gifts for the family. I've been working on June in the past week and realized I'd forgotten to post February's edition. I used Papertrey Ink's Birthday Classics: February stamp set and Scarlet Jewel patterned paper. I also used a couple of Papertrey dies: the heart border as well as the Monthly Moments: Spiral Notebook die. I was feelin it needed something else so I hunted through my stamps and found an older set from StampinUp! - a Sell-A-Bration set called Fresh Vintage. Not sure if you can see it in the photo but it just adds a little something to break up that space. And on this particular card (there are 8 of these cards) I used a distressing tool to rough up the edges. I made half of the cards using the Fine Linen cardstock you see here. The other half I used Soft Stone. Both colors looked so pretty with the Scarlett Jewel and I just couldn't decide LOL!
I'll post June probably tomorrow. Thanks for stopping by!

Tuesday, September 16, 2014

Sprinkles Birthday

 When this Make it Market Kit from Papertrey Ink (called Shakers & Sprinkles) went on sale - I was in Italy. When we got back from our trip and I saw it - my initial thought was - darn! But it took me about a second to say to myself - hey you were in Italy... ITALY. You are a lucky girl. If I was supposed to have this kit - I woulda had it. And, I got to go to Italy. Nuff said right?
Well there was such an overwhelming demand for this kit - they made more. And long story short - I caved. I mean how can you resist that word "Sprinkles" (not to mention the other dies in this kit. It's a wonderland of dies I tell you. And to a die-cutting fan like myself - it is a little bit of heaven).
Another wonderful thing in this kit (there are so many) is the little confetti stamps. Oh be still my heart. So stinkin cute it should be illegal.
And when I had the chance finally to get to use the kit - to make a birthday card for just the sweetest friend on the PTI board - Little Mabel (yes that be you Sandy!) - I jumped on it. I really wanted to do a shaker card (what the kit is all about to be sure) but my moments were limited and I wanted to get the card to her on time. (The kit does make the shaker a much more doable thing for sure but I really have to sit down and take my time - and that wasn't happening in the last week and a half).  For the sparkly Sprinkles die cut word I used some Doodlebug Sugar Coated cardstock - omg - that stuff is just awesome. So easy to use and fabulous results. No mess just cuteness! I added this side view photo so you could see the word die closer (I actually cut 3 or 4 out of white cardstock to get a little thicker and more stable die cut) and when i was done stamping and assembling I decided to throw on a few clear sequins to add to the sparkle.

okay kids that's all for today! Thanks for stopping by

Sunday, September 14, 2014

Thank You Glasses

We took a visit up to Baltimore to visit my husband's Aunt and I wanted to send her a thank you. She's one of my most favorite people in the world. When we visited, we went to lunch at a restaurant right on the water, then took a stroll around. She grew up in the area and knows so much of the history. It was a wonderful afternoon. We stopped back at her place and were getting ready to head back to Virginia when I realized I'd lost my clip-on sunglasses. I truly am lost without them - my eyes and bright sunshine don't get along. We looked a little but had to get on our way. Don't you know she called me the next day to let me know she found them and a few days later they were in my mailbox. She's a sweetheart. So I decided to combine my thank yous and made this card. I cut the glasses using my Silhouette portrait. The flowery printed paper is actually Hazel & Ruby wrapping paper - so pretty. I cut the scallop & banner with dies from Papertrey Ink. The sentiment is from the Banner Sentiments stamp set from Papertrey Ink as well.

Saturday, September 13, 2014

Birthday Buddies (Part 2)

Sorry I didn't get back here yesterday. Spent the day waiting for the new refrigerator that NEVER came. Oh now that is a story you will not believe. For another day when there is no longer steam coming from my head :-)
So where did I leave off - oh yeah Birthday Buddies. I am happy to report that the birthday corsage seemed to go over well - it was worn proudly and couldn't have made me smile more. Amy - if you're reading this - you're a sweetie (but then we know that don't we!)
Ok so my second birthday buddy - well she's such a dear that she has a slew of friends. One of whom got us all together to make a special birthday book for her. Literally friends from all over the world contributed to this gift. Everyone created pages to be put into book form. Quite a collaboration - but then she is quite a special woman. So my contribution was something like a shaker card that opened.
The first pic is what you would see when you came to my page in the book


Here's a closeup for you to see there's a little tab on the right hand side that says "Lift here". (The tab is a diecut from Quickutz.)


And when you lift up that page this is what you'll see


A little song, that we all know, to accompany the viewing of the main page below. (That main music image stamp is by a company that sadly is no longer in business. I just wrote in the words. I drew the little banner at the top.)


Since this friend is known for her beading I felt compelled to create a shaker card with beads. It was quite a sparkly affair.
And how can someone not enjoy a shaker card, I ask you?
(The stamps on the cover page and the "wishing you a very happy birthday" die here as well as the balloons in the background behind the beads - all from Papertrey Ink)

Ok - that's all for today. Thanks for stopping by!

Thursday, September 11, 2014

Birthday Buddies (Part 1)

All the time I was growing up I never knew anyone who celebrated their birthday on the same day as me. But in the last few years I've met a few. Crazy huh? One of them is far away and one is very close by.
The friend that's closeby I will be seeing today - we're having a little gathering at a friend's house. And I'm bringing along a little gift for her. I should note this birthday buddy is a good bit younger than myself LOL but I've made a crazy little gift for her. A blast from my past - ze birthday corsage. When I was in 6th and 7th grades these were all the rage. A big old bow to which you attached candy - the popular candy choice at the time was bubble gum. Or chewing gum. Here and there you'd get some Lifesavers but gum was big. These assemblages were total have-at-it deals. Long streams of ribbon with gum attached. It was kind-of-a big deal at my school - friends would make you these corsages on your birthday. You might be wearing 3 or 4 of these corsages and it was a hoot.
For my birthday buddy,  I decided to skip the gum and go hard-core - chocolate - lots of dark chocolate and a ton of ribbon. And I made a tag to go along with her chocolatey corsage. I used the Shakers & Sprinkles Make It Market Kit from Papertrey Ink. There are a number of amazing dies in this kit - but the word dies are so beautiful. That word "Sprinkles" is one of those dies. I cut it out of glitter paper - pink and sparkly! (I also die cut the word out of white cardstock 3x, glued them together and then sponged on some pink ink to cover the sides of the diecuts then adhered them all to the back of the glitter diecut) The tag is PTI's Tag Sale #6 - one of my favorite tag dies to be sure.  I used some of the confetti-type stamps as well as the word stamps to finish up the tag. Such a great stamp set.
I tried to get a pic of ze corsage. The pic really doesn't do it justice :-) If I'd had more time it woulda been an epic corsage but this, I am sure, will be met with a few laughs. Each piece of candy (Hershey's Bliss Dark Chocolate) was wrapped in PTI's Hibiscus Burst Bitty Dot paper then tied up in curling ribbon (Hallmark).  I just have to attach a large safety pin and make the birthday girl wear this whilst we celebrate! It's all in good fun and I think she'll really be amused.
Tomorrow I'll share the little greeting I sent to my other Birthday Buddy. It's really a collaborative effort. You need to come back and see :-)


Tuesday, September 02, 2014

Papertrey Ink Make It Monday: #178 Easel Card


Today I decided to give this week's Make it Monday challenge a try. I loved that easel idea and it's good to try something different - get those creative juices flowing right? I cut my easel using a few of the Fabulous Frames dies (cut out the "legs" with the largest frame die and then added one of the detail dies). Then I used the Woodgrain Impression dies to give my easel a little more authenticity :-) I also cut a few strips to use at the bottom of the easel to create the ledge. I sponged on some Kraft ink onto the Kraft cardstock to bring out the woodgrain. Now onto the image area. I decided since my kids aren't in school anymore, I'd make a card for a friend who has been ill. I wanted the easel to hold a little work of art (the whole easel thing was making me flashback to one of my studio classes in college anyway). I used some watercolor paper and stamped the image and sentiment from the Autumn Abundance stamp set. I love that set. Such beautiful images. Then I set about watercoloring it using inks from PTI: Scarlet Jewel, Harvest Gold, Fine Linen and Kraft. The green is Old Olive from StampinUp. Anyway I really like how it came out - love those Make it Mondays!

I wish the second photo could've been better but wanted to include it anyway so you can see how this little card looks standing up. So cute.