Tuesday, February 25, 2014

PTI February Blog Hop

So over the weekend I was anticipating this blog hop and didn't know what I was going to do. I did however want to try something I'd been thinking about for a while - which was trying coloring images on different colored cardstock. So I pulled out the Year of Flowers: Daffodils set. I'd bought it a little while back but hadn't had a chance to use it. I stamped the image on Fine Linen, Soft Stone and the Guide Lines 1 Grid cardstocks. All were colored with Copics (originally stamped with SU Sahara Sand - I wanted the stamped image color to be more muted).
The first image here is the one stamped on the Guide Lines Grid paper. I think this one's my favorite. I stamped the sentiment in New Leaf ink.


The second card is stamped on Soft Stone. I kinda like yellow and grey together. I masked the same sentiment to just use the word "hello" and stamped in Smokey Shadow. Not my favorite - I was having some trouble with my shadowing ;-(


And for the last card - stamped on Fine Linen cardstock. The sentiment is stamped in Kraft ink.

It was a fun little experiment. I actually did another card - stamped on Kraft cardstock and colored with Prismacolors - that'll be a post for another day.

Thanks for stopping by!

Wednesday, February 19, 2014

A Sympathy Card


Haven't had much time for card making the last few days. Been working with paper but not the fun kind! You'll find me under a large pile of paperwork. Boo! However I did need to carve out a few minutes to make a sympathy card. (I really need to work up a stash of cards again. I have a small stash but alas no sympathy cards. )
These are always the most difficult cards - you want the convey the proper feeling and use a suitable sentiment. I recently purchased a wonderful sentiment set by Lizzie Jones for Papertrey Ink called Words of Comfort. It has the most perfect sentiments. I paired it with one of these ferns from PTI's Meadow Greens.
As often happens with me (don't know about you) - I start off with an idea of how I want a card to look - and I end up in a completely different place. I started making what was in my head and it just wasn't working. I did want to use the Linen and Canvas Impression plate (also PTI) which gave the Vintage Cream cardstock such a beautiful texture (I think you can see it in the photo). Then I thought why not stamp directly on that? Not exactly a new idea - but sometimes the simplest idea is best.
Okay I'm off to jump back into that pile o'paperwork. Hope to take another break to make something soon. Thanks for stopping by!

Friday, February 14, 2014

Special Delivery Challenge - Papertrey Ink 7th Anniversary


Okay normally I don't post more than once a day - see below for my Valentine Rakarama post. However I saw the challenge posted on Papertrey Ink's blog. I've just been making some little notes for friends at work - and decided I'd enter in this challenge. I made envelopes with the WeRMemory Keepers Envelope Punch Board using the paper (My Minds Eye) I used in my Rakarama cards. I had lots of scraps :-) perfectly sized for these little cards. The cards themselves are 3x4. I cut some gold shimmery cardstock I've had in my stash forever using the Wonderful Words: Friends die. I also used a PTI scallop die. The inside sentiment is from Boutique Borders: Friends. Such a pretty sentiment.  For the envelope I used the Label Basics dies to cut out the two angled rectangles (one from the My Minds Eye paper and one from Rustic White cardstock).  The envelope sentiment is from Mini Blooms. I also used some kraft and fine linen inks to age that sentiment strip.  And the flower - I ripped a page from an old dictionary and cut it using the Notched Flowers die.  I stippled the flowers with some SU Purely Pomegranate ink as well as the PTI Kraft and Fine Linen inks. The button is from the Holiday Mix Vintage button collection. I stitched those flowers together with my bakery twine.
Sorry about the pics - I'm in a rush to get these finished - hope you're having a good Valentine's Day!


The 10th Annual Valentine Rakarama!

I cannot believe it's been 10 years since I started my little tradition of sending Valentines to my crafty girlfriends. I really look forward to it every year. Valentine's are probably my favorite card to make. I don't know why, but there is something about making Valentines. Even just sending Valentines. Love it.
I clearly remember - going back to elementary school - going to the Pharmacy in my little town in northern New Jersey (we moved there when I was 8 from New York) and buying my very own Valentines. They were Peanuts :-) You know, Charlie Brown, Snoopy... Yes, we normally made our Valentines.... using doilies naturellement! but I was in love with Snoopy at the time. And they were such pretty Valentines. I even had a red Flair marker (for those of us who are a certain age.... Flairs were big back then. It was the beginning of my life long obsession with pens. But I digress... you knew I would....) I wrote each Valentine with my best handwriting with that red pen and I was the happiest little girl. Ahhhh.

So fast forward (we shall skip the number of years ... suffice it to say The Beatles had played Ed Sullivan a few years before LOL) and I'm still doing my Valentine thing. With the hope that the recipients will know I'm thinking about them - sending lots of XOXO

For those of you who are familiar with my Rakarama (i've got some previous years linked up in the sidebar - just haven't gotten around to linking them all) in the past I've taken to challenging myself to making each Valentine different - sort of the "snowflake" of valentines... no one valentine exactly the same. Well, this year that wasn't happening. I've got some stuff preoccupying my life right now so I had to go a more simple route. Well... nothing with me is quite simple. I got started and kept adding things and well... it took a while to assemble them all. I'm up to about 30 Valentines this year.

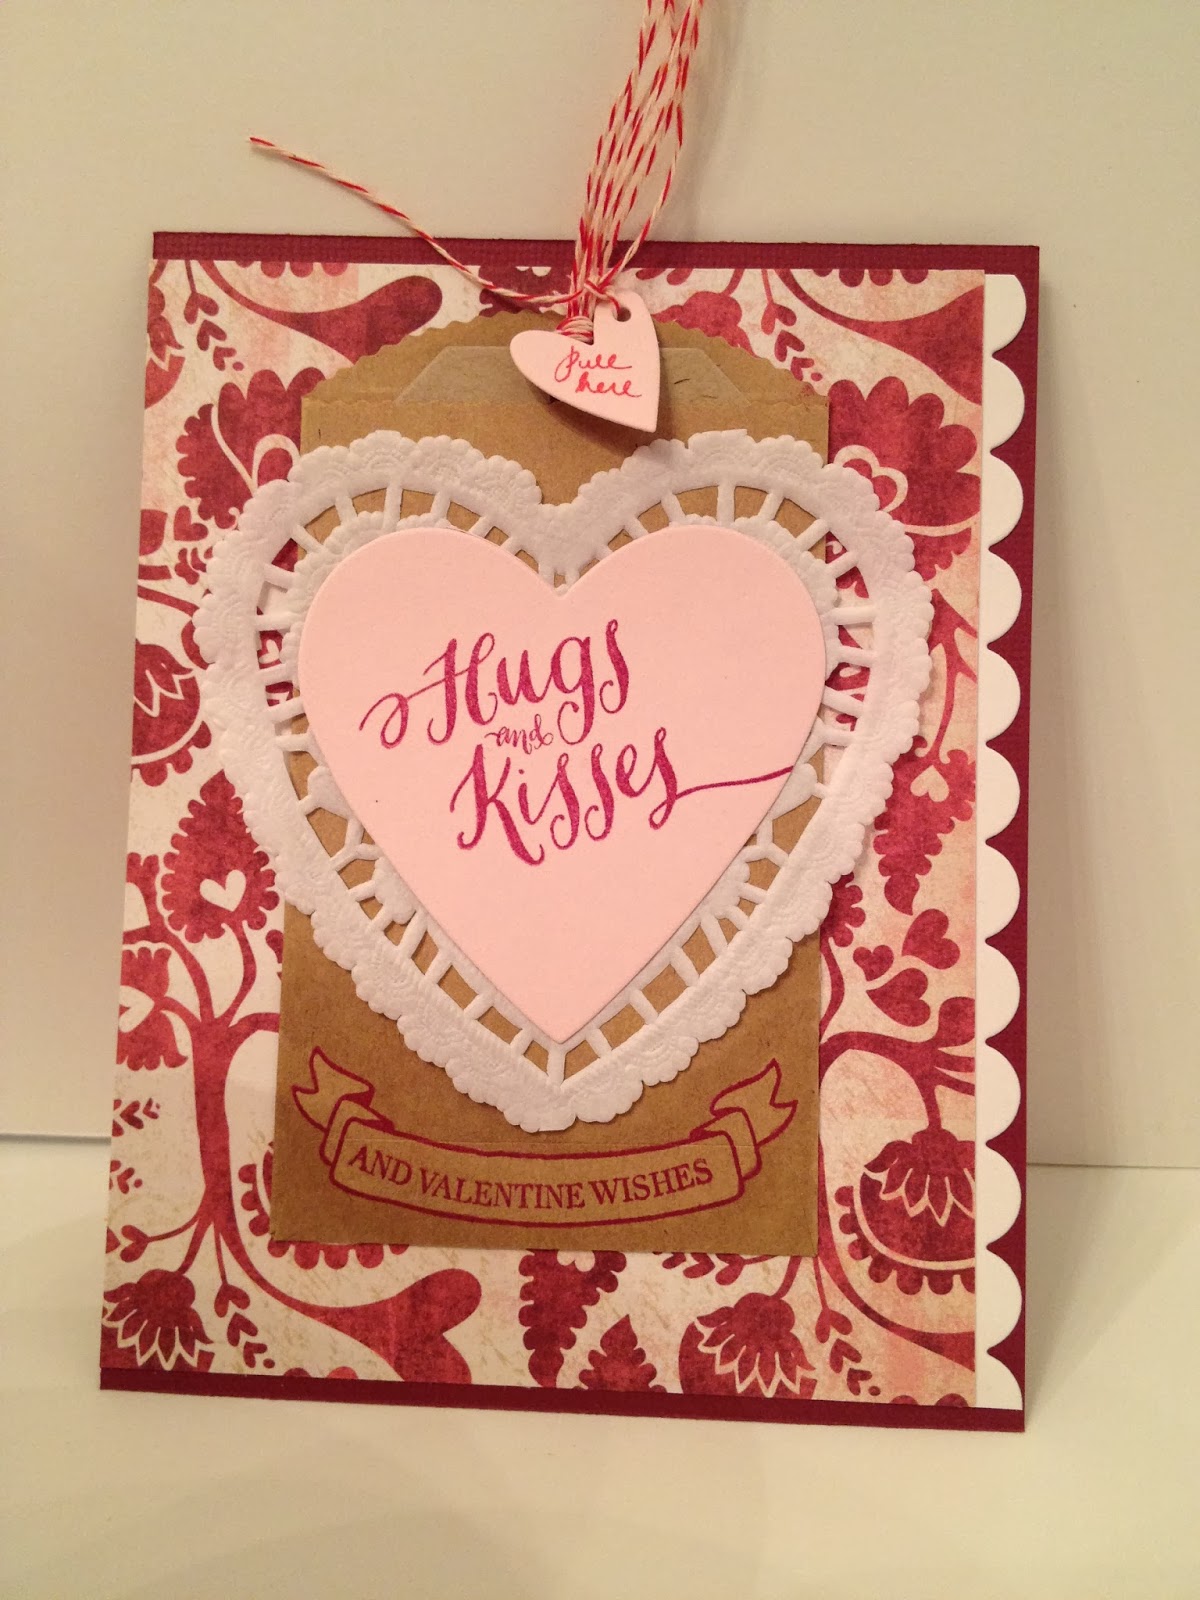
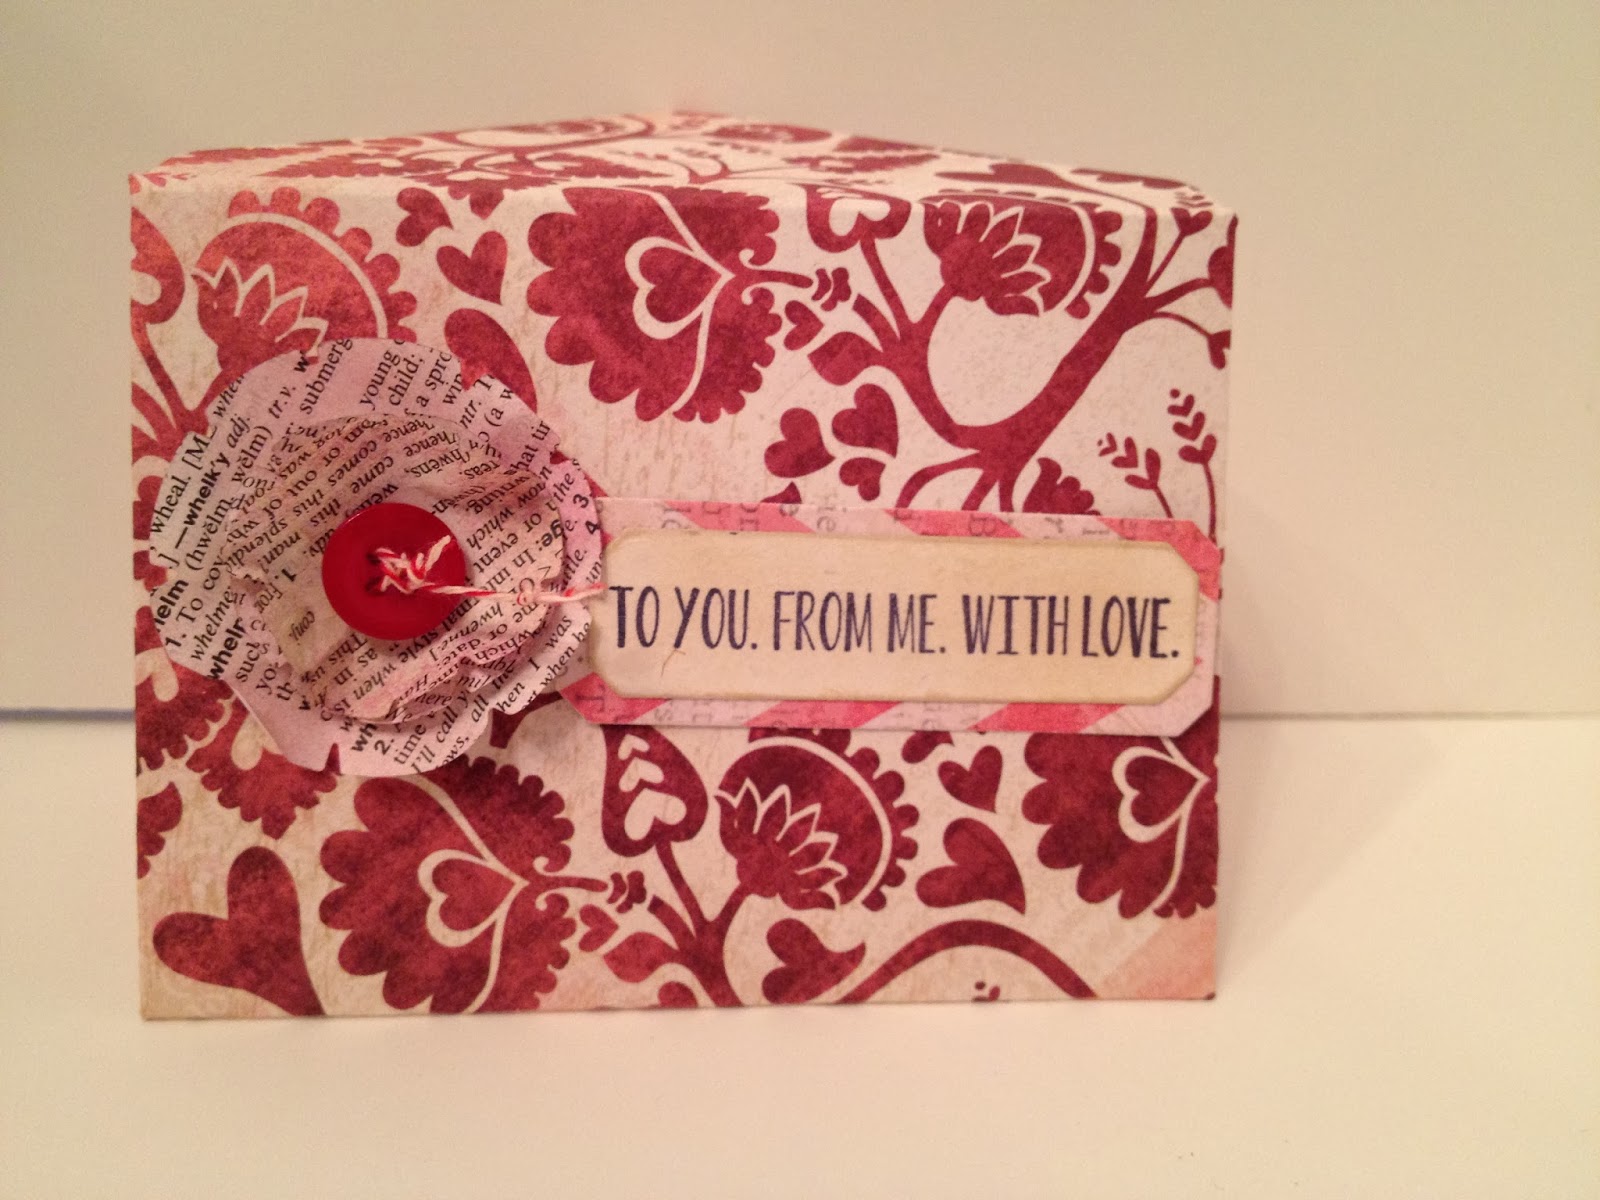
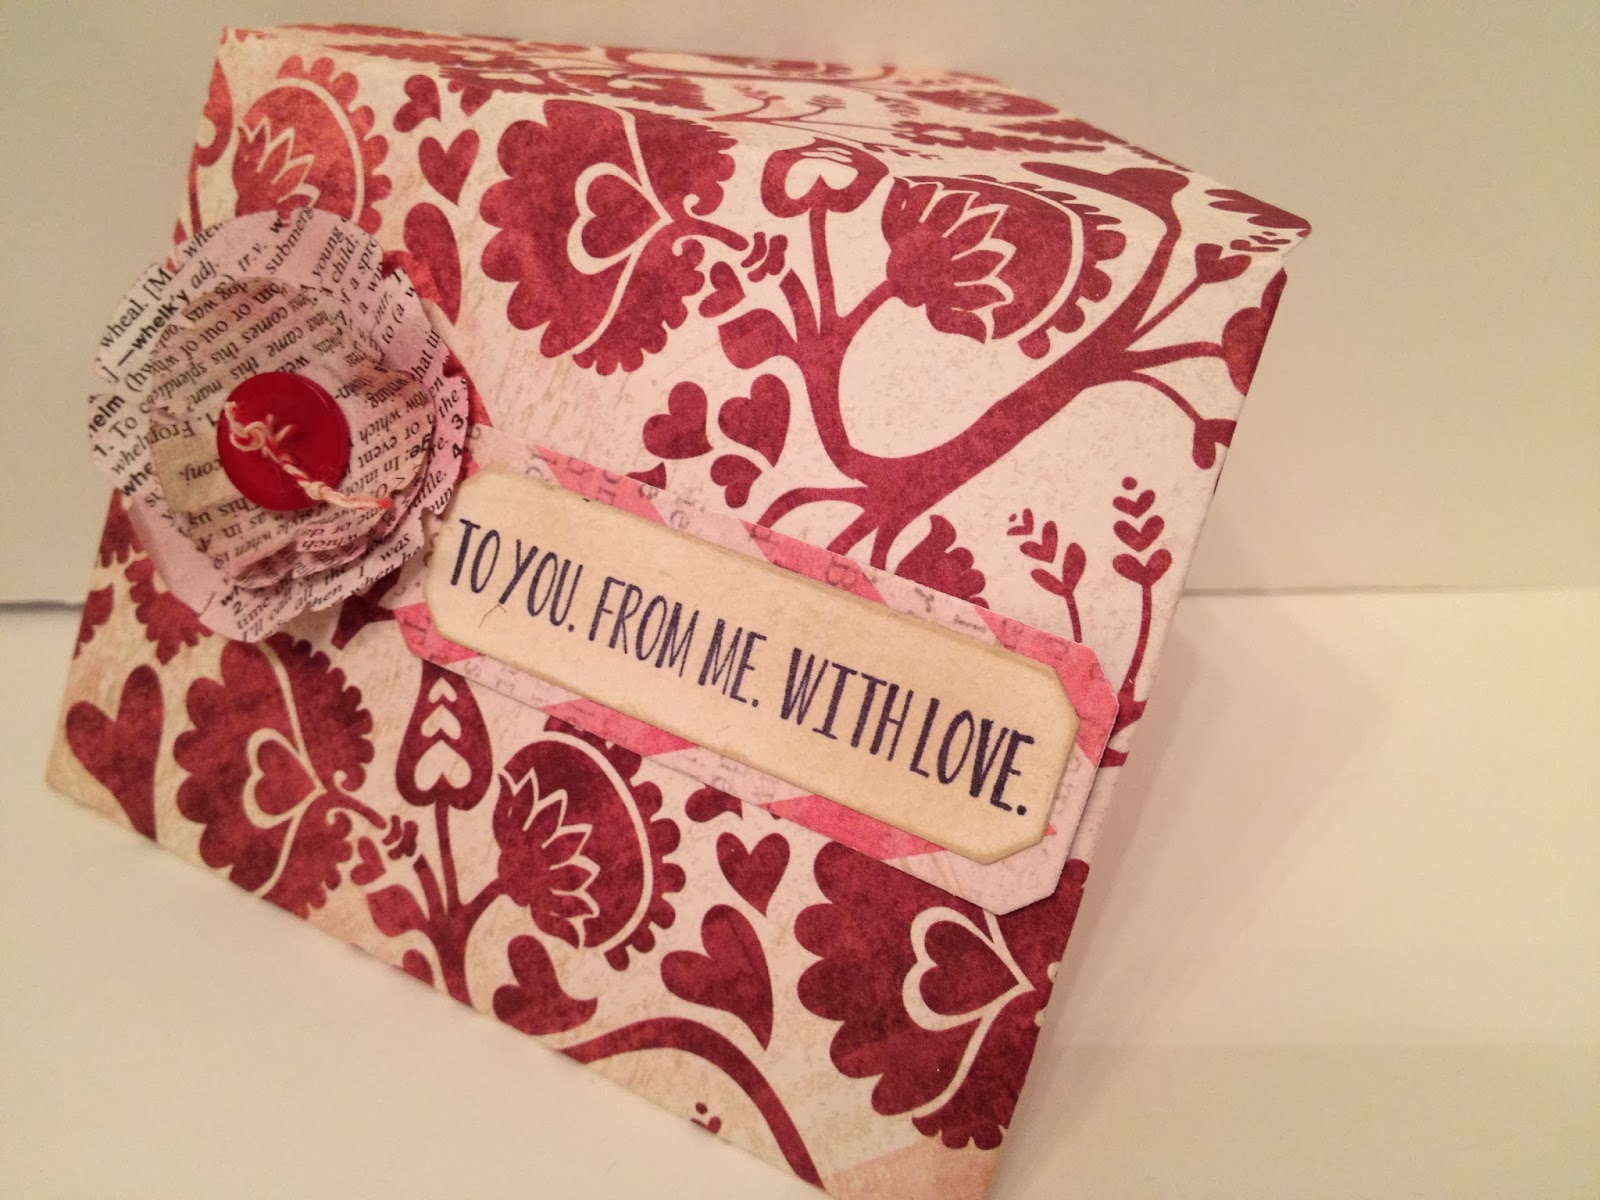
I started thinking of these valentines back in December - knowing I wanted to use a tag and a wee paper bag (some of you know I love paper bags.... and kraft cardstock). January 1st rolled around and I started getting serious. I thought I had some little paper bags in my stash but they were no where to be found so I grabbed some at Michaels. I had been looking around online and found a very pretty patterned paper I just couldn't forget - and with me - that's the sign I must purchase LOL. So I bought a bunch of this patterned paper - from My Mind's Eye Lost & Found Record It!
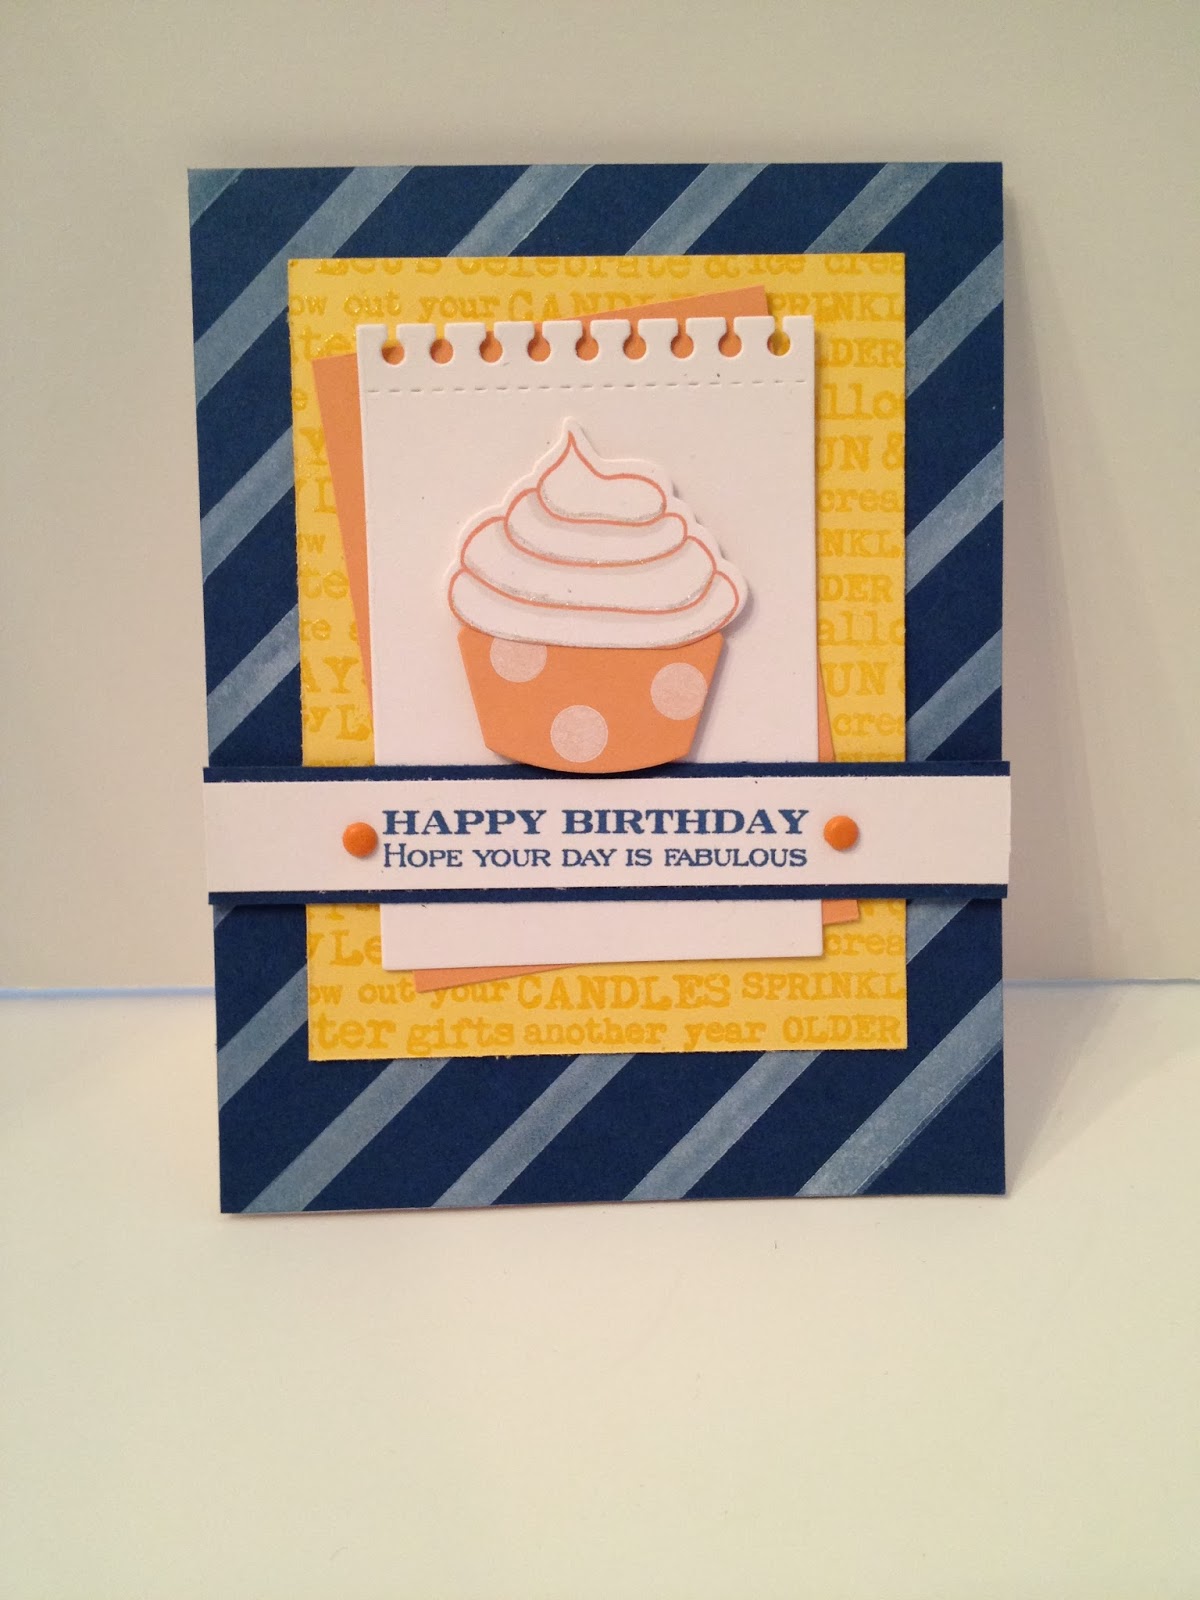
The stamp set is from Wplus9 - Valentine Wishes - can I say how much I am in love with this set? I am in love with this set! The calligraphy, the banners, the fleurs. Too fabulous for words. I stamped the sentiment with StampinUp Purely Pomegranate (not even sure if they make that anymore?) - it was just the perfect red to go along with the patterned paper and the beautiful Bazzill cardstock (Juneberry).
I'm going to discuss the banner area in a minute.
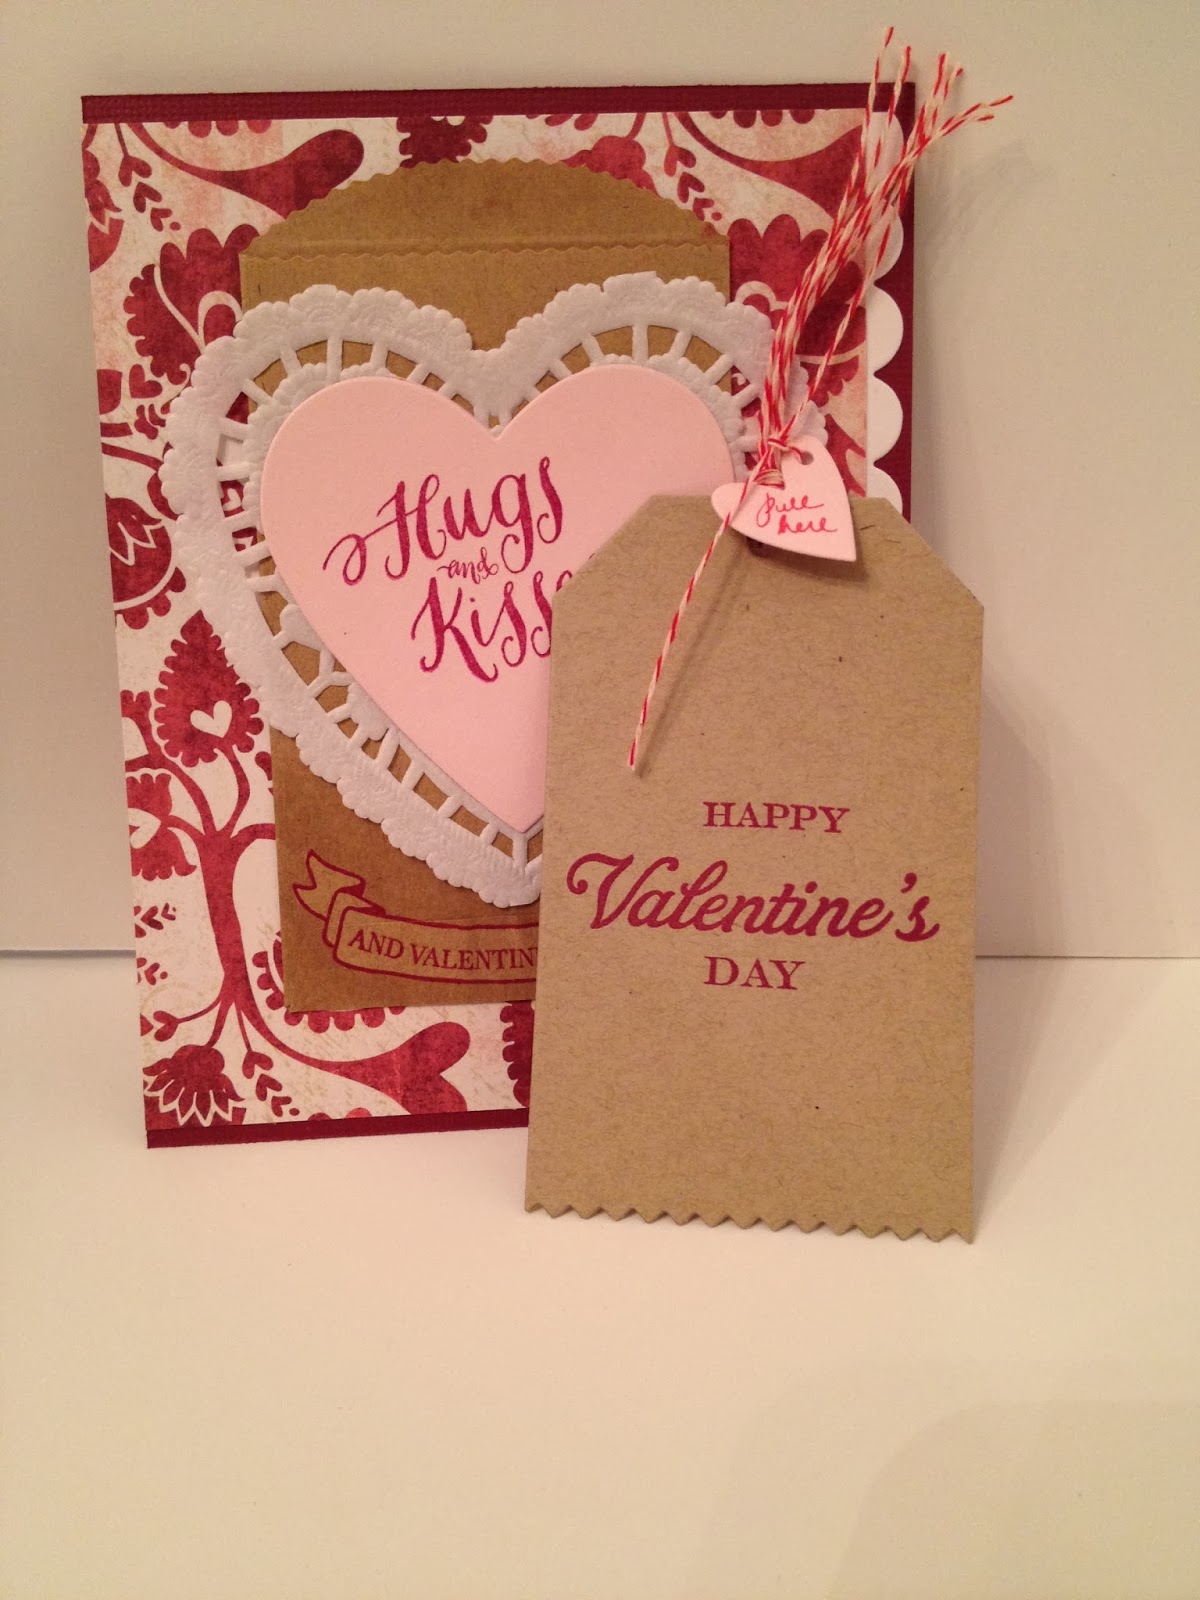
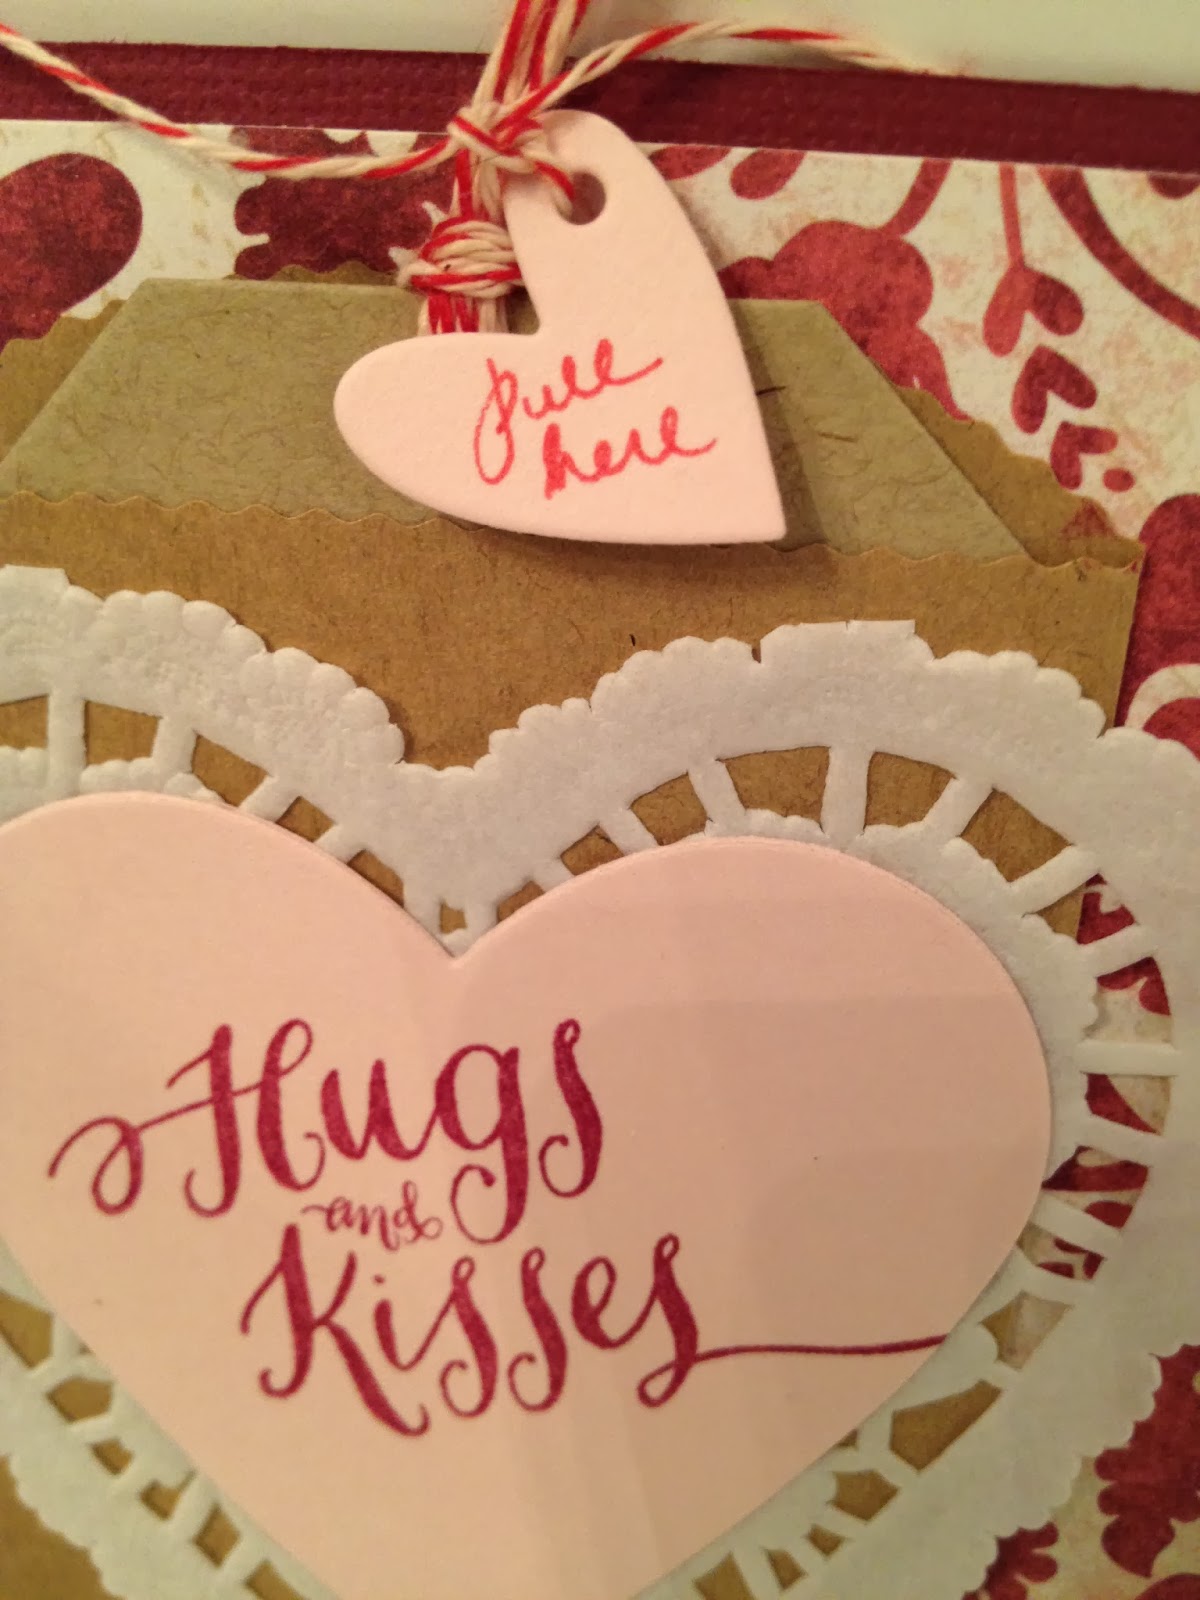
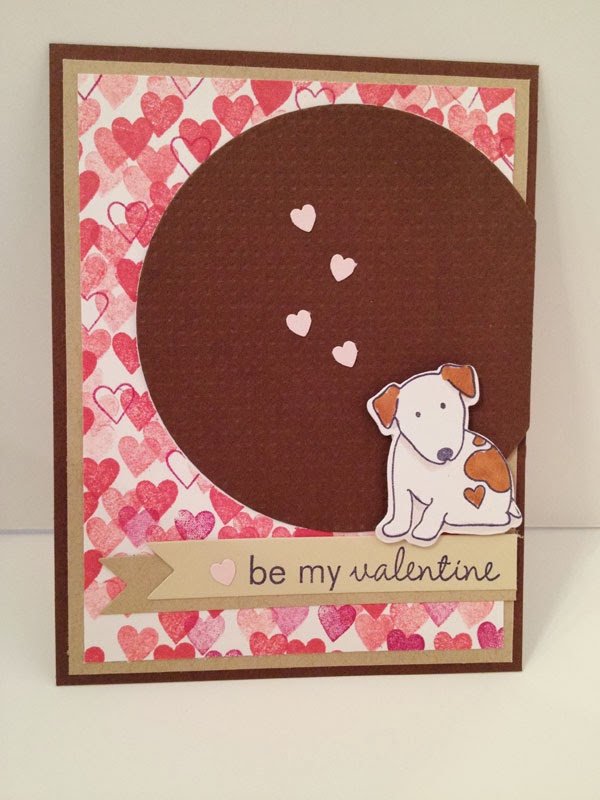
A few more notes - the tag was cut from kraft cardstock using PTI's Tag Sale #7 die. The little heart tag tied on at the top was cut using Tiny Tags from PTI.
The pink cardstock - which is just the perfect shade of pink - is from Wplus9 - called Ballet Slippers - the most aptly named cardstock if there ever was one.
I used a scallop border die from PTI as well.
The heart doily - is just that - a heart doily - got a whole pack of those a while ago and put them away for a rainy day - or Valentines ;-)
Almost forgot - the Happy Valentines Day sentiment on the tag is from the Happy Day set from PTI. Also the pink heart was cut from the PTI Limitless Layers: Hearts dies

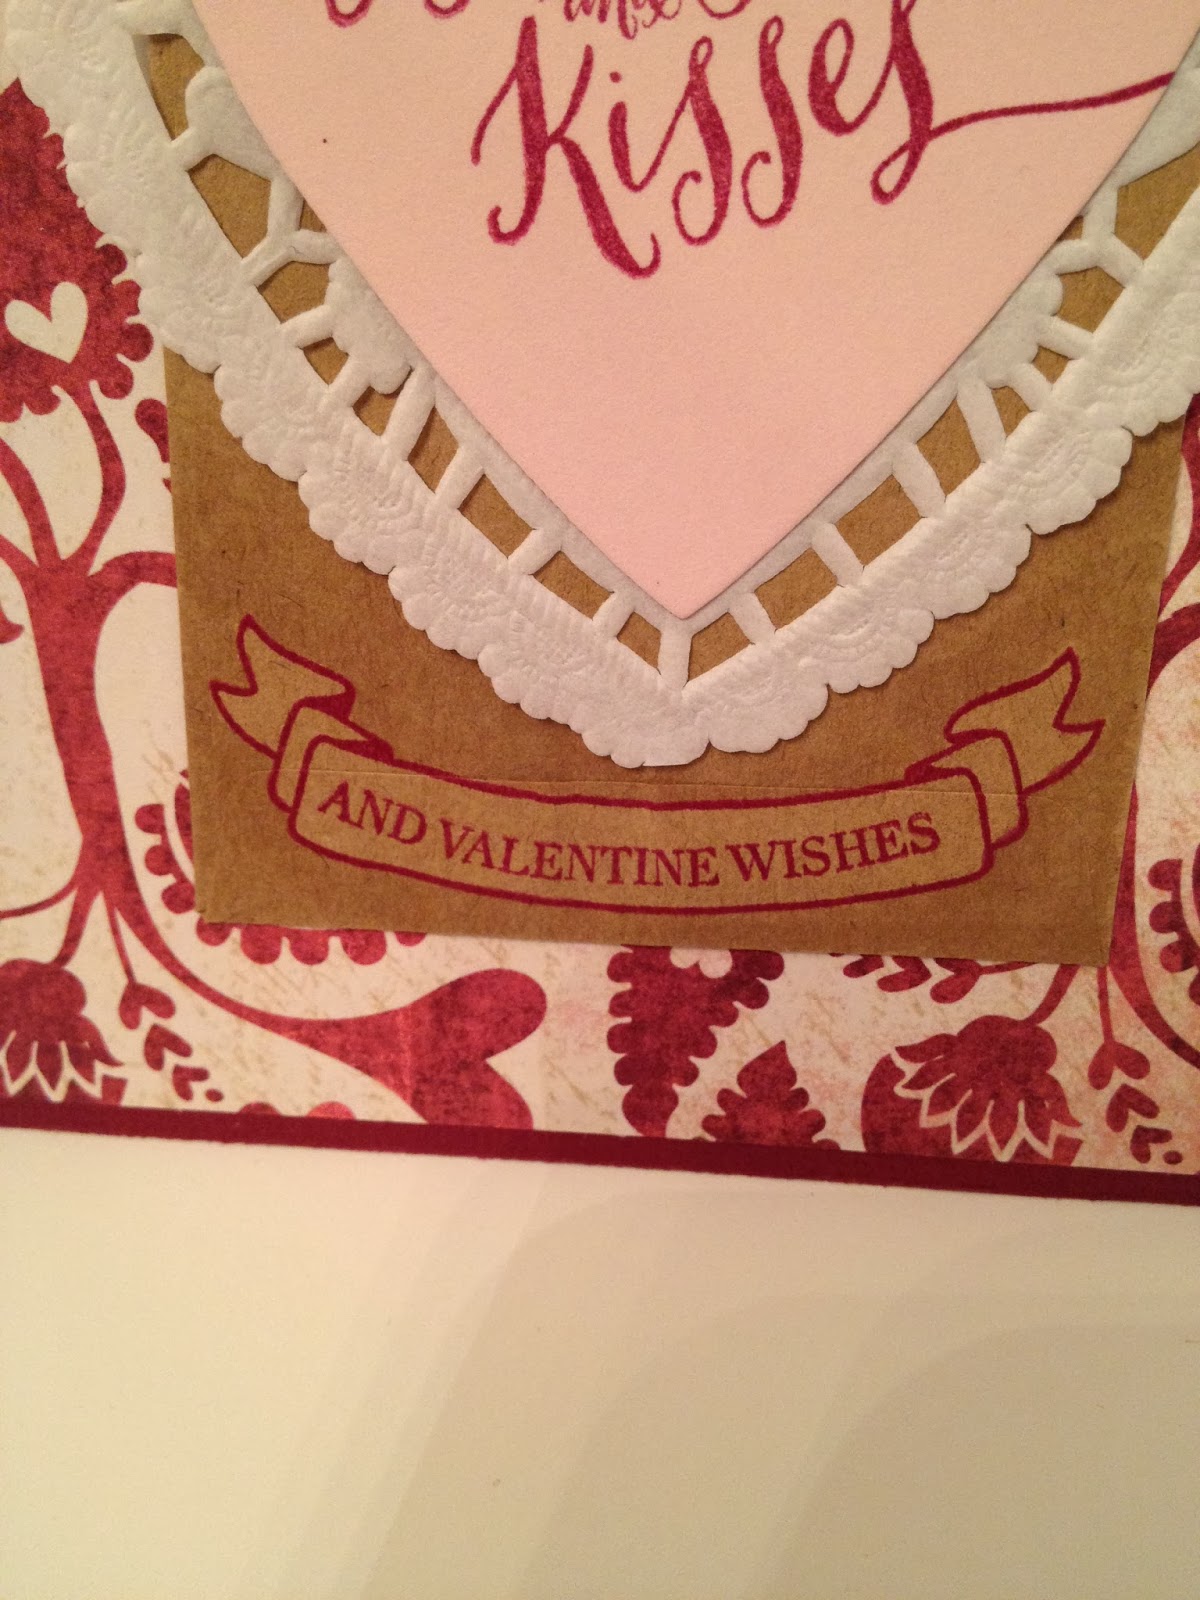
Okay now that banner. I stamped the banner on the wee little bag. Then I took the sentiment that goes inside it - bent it in the opposite direction - and placed it on my acrylic block. Sometimes you just need to work with what you have to make it work (I guess the banner was designed to work one way - but I wanted to use it another way)
Once that banner with sentiment was on that bag-  I wanted it to stand out - pop it up a little from the background (and I didn't want to do anymore diecutting). So I took a Copic Marker W1 - and colored all around the bottom section of the bag to get the effect I wanted. I think you can see in the picture that the banner looks much lighter than the surrounding bag.
Finally I used a lot of bakery twine (i have a huge roll - like the kind they use in the bakery). Tied the little heart tag to the larger kraft tag and put that large tag in the bag and I was done.
So that wraps up the Rakarama this year. As much as I loved every minute this may be the last. (well maybe til December of next year when I start to get vision of Valentines dancing in my head instead of sugarplums). Thanks for stopping by...and Happy Valentine's Day!
ETA: when I went to link up my card earlier today to the Step it Up Challenge at Wplus9 I wasn't able to - I was so disappointed. Now I just found out the deadline has been extended! YAY!
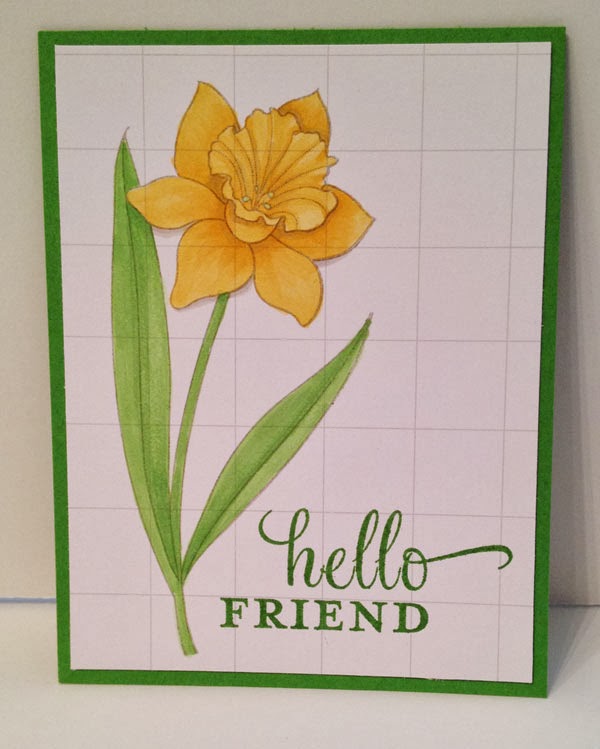


Thursday, February 13, 2014

Building Blocks of Design Challenge - Papertry Ink 7th Anniversary Day 9

Okay so the challenge (over on the Papertrey Ink blog)  is to visit all the design team blogs and gather your building blocks (choices) to make a card. From each list (block) you need to randomly select an item to work with.
So my colors were: Harvest Gold, Enchanted Evening, and Melon Berry. Kinda hard I was thinkin.... I almost tried again with the random generator but figured I might as well try right?
My neutral selection was white; occasion selection was Birthday; technique was heat embossing (yay); embellishment was brads (ok... i got those); and finally Fiber selection was ribbon. I am going to say now I didn't include the ribbon - it just wasn't workin for me.
Oops there was one more element - a sketch. I picked #5 (which can be see on Dawn McVey's blog)
So with all that to work with I decided to use the following stamp sets - all from Papertrey Ink.
Background Basics: Super Stripes - for the background (duh LOL). I stamped using Fresh Snow ink on that Enchanted Evening cardstock. 
Background Basics: Birthday Fun - stamped in Versamark then clear embossed.
Polka Dot Basics: I had a scrap of Melon Berry cardstock that I'd previously stamped using Fresh Snow ink.I used the die from the Cupcake Collection set to cut out the cupcake liner.

Cupcake Collection Stamp set - I also stamped the frosting using Melon Berry Ink, hilighted that frosting with a Copic marker (W1) and added a little sparkle (which I don't think you can see in the photos with a Gelly Roll glitter pen).
I assembled the cupcake and adhered it to a piece of white cardstock that I cut with the Spiral Notebook die - then backed that up with a piece of Melon Berry cardstock.
(are you still with me LOL.... almost done.... hey there's lots of "building" goin on here)
I needed a sentiment. I used one from Boutique Borders: Birthday. Such a pretty sentiment and I thought the fit was good. I stamped that using Enchanted Evening ink.
And finally I went to a little mason jar where I've got a big pile of brads. I picked thru there and found a couple I thought worked nicely color wise.
I'm not sure how much I love the color combo - but I will say I kinda like how the embossed Harvest Gold background picks up the Melon Berry - kind of gives a cast of that color. (I'm having something of a flashback to Mrs. Gates- my advisor and professor in college. I did my Serigraphy Independent Study under her - it was more or less a color theory challenge back in the day ;-) I think she'd be amused.)
Okay kids, I'll be back tomorrow with .... the 10th Annual Valentine Rakarama!!! (shut up! yes... it's been 10 years...) You don't want to miss it!


Sunday, February 09, 2014

Pocket Scrapbooking


I made three little 3x4 pocket scrapbooking cards for the Monthly Moments Trading Card challenge at PTI last night. I had a few minutes and decided I'd give it a whirl - but I didn't check the closing time on the challenge so.... didn't get these in for the challenge. But I had a quick bit of fun and that's what its really all about. I'm so into my Valentines I wasn't participating in all those fun challenges.

So here are mine. Sorry about the pics - its a little dark out this morning and I couldn't get a good pic to save my life. anyway....I'm gonna put them in my box of scrapbooking cards - yes I make little cards now and again with scraps or when the spirit moves me :-) That's whats so fun about these little cards. Just like ATC's - it's this wonderful little canvas and you can just have at it!

For all three I used Papertrey Ink's Big Ticket Basics stamp set. I used the coordinating die on the second one - to make that ticket. On the first one I used the Double-ended banner die. And on all three I used some pretty patterned paper from the Pacific Vineyard paper pack; cardstock colors are Fine Linen, Ripe Avocado and Royal Velvet.
Funny thing - I bought Big Ticket Basics primarily to use in my scrapbooks.
It's such a great set for that - and I've used it in my scrapbooks a few times already. And made some greeting cards as well. It was fun to pull it back out last night. I haven't really had time in the last 4 or 5 months to do any scrapbooking. I'm hoping when a few things fall into place around here over the next month or so I'll be able to get back into a regular schedule of scrapbooking.
We are planning a very big trip in April and May - so excited about that and I'll share more about it in the coming months. But I'd already decided to make something of a travel album ahead of time - to record as we go from place to place. I know from experience, coming home afterward and trying to remember all the details is really hard. I want to make sure I don't forget a thing!
Okay - off to begin my Sunday :-) Have a good one!

Saturday, February 08, 2014

PTI Anniversary - Sketch & Color Recipe Card Challenge

So over at Papertrey Ink they're having all kinds of challenges in celebration of their 7th Anniversary. Here are the two recipe cards I used to make my card

http://nicholeheady.typepad.com/.a/6a00d8341c64e753ef01a511649ef8970c-pi


http://nicholeheady.typepad.com/.a/6a00d8341c64e753ef01a73d6ffc69970d-pi

I used the Tremendous Treats: Valentine stamp set and die to stamp the adorable puppy and stamp the sentiment. I also used the little heart stamps in the set to create the background with 2 different colored inks: PTI Pure Poppy and SU Purely Pomegranate (I need to get me some Scarlet Jewel ink but in the meantime I think it worked out just fine). I cut the little banner using the Double ended banner die from PTI. I cut the large circle with a Nestabilities die and then used PTI's Aida Impression plate to give the card some texture. The little hearts were cut using a Fiskars heart hole punch I've had for years.
I'm up to my ears in Valentine making right now and having such fun - it is probably my favorite card making holiday of all - no... it's definitely my favorite :-)  But I had to stop and create something with all those fun challenges going on over there at Papertrey Ink.
Thanks for stopping by!

Sunday, February 02, 2014

Make it Monday #150 - Window Screen Cards

Getting this one in under the wire.....
Finally had some time this afternoon - Sunday- sheesh! to try this fun challenge. I used all Papertrey Ink stamps and dies. The stamps are from Birds & Blooms. It has such beautiful sentiment stamps and there are, of course, those cute little birds. My "screen" is the Hexagon Cover Plate Die. I chose to put some of the cut out hexagons back in place. I also used the Woodgrain Impression Plate for the kraft cardstock background. I cut my own little banner for the sentiment. Finally, I used the Fabulous Frames die collection to cut the frame from Aqua Mist Gingham patterned paper, and mount the whole thing on a piece of Aqua Mist cardstock. Then I added some bakery twine to finish the whole thing off.
I'm now off to make some dinner and probably sit down for a little while with my husband to see some Super Bowl (me- the commercials and half time show probably accompanied by some coloring with Copics :-) ; the husband.... well you know). Have a good one!
ETA: I'm entering this card in the Moxie Fab World Challenge: Hexagons: Happy for Hexagons