Monday, May 20, 2013

Graduation Card: Gimme some tassel!

Do you remember this from Disney's Aladdin? Genie says "Yo Rugman, gimme some tassel!"
Well my daughter loved this movie as a child. (Actually any Disney movie. We love our animated movies.) So while I was pondering my options for cards I was thinking about "graduation" things. Mortar boards, robes, tassels. Yeah... tassels.  And I recalled this quote. I pictured her saying this when she was small. So cute. And then I thought of making this card using that line. I found a tassel at the Silhouette online store. Only problem was it had a different year. I managed to create my own year charm hanging off the tassel - score one big Silhouette software achievement for me (I'm still struggling but I'm getting better LOL!).
Alrighty - that's all for today. I'm at the graduation, then dinner out with family. Have a great day!

Sunday, May 19, 2013

Graduation Card: Reach for the Stars

So, my daughter is graduating from college on Monday, tomorrow. It's a little crazy - it seems just like yesterday when she began. But here we are. I think since she's my "baby" that the time just kind of sped up. I remember having similar thoughts when my son graduated from college - but this REALLY went by fast. Anyway - special events require a card from me :-) natch. So I made two! Actually I couldn't make up my mind on what I wanted to do - I had several ideas. One funny and one serious. So here's my "serious" one ;-) I used PTI's Star Gazer Additions stamp set. It has some very nice sentiments as well as that large constellation stamp. When I bought this set I had in my mind doing the polished stone technique and I think, for the most part, it worked out well. I had a tough time getting a pic I liked - one that showed off the gold highlights.  I clear embossed the large image if that's not apparent then created the polished stone over it. The sentiment was stamped in Versamark as well but I used gold embossing powder.
So last week I mentioned we were heading up to New York City and I'd explain why. My daughter had one of her illustrations entered in a competition. And she was one of the winners. If you are an illustrator, this was a prestigious competition. So on Friday night, we went to the opening of the show for the winners. It was quite the night. For her, and for her proud parents :-0 After the opening we went out to dinner in the city - my nephew and his wife had driven in from NJ - a really wonderful time had by all. Then we had to drive back Saturday because today, Sunday, we have to drive up to Baltimore to attend my daughter's graduate exhibition. I guess that's what you call it LOL. All the seniors put on an exhibition of their work. We've got a bunch of family coming in for it. It's going to be another great day for her. Followed by the graduation tomorrow.
So I'll be back with the other card - have a good one.

Wednesday, May 15, 2013

Tinkerbell Birthday

So next Monday is the birthday of my youngest niece. My sister's baby. She will be 5 (goin on 15). And she is theee girliest girl ever. She loves pink and anything sparkly. Did I mention glitter? This girl loves glitter. And she loves Tinkerbell. She has decided her birthday shall have a Tinkerbell theme. (Yes, I said that right. She decided. LOL) As she lives on the other side of the country (much to my great dismay. No, sadness. I wish I could be with her on her birthday.  Maybe another year. This year in particular it's not happening. On Monday I shall be attending my daughter's graduation from college! But we'll talk about that in another post.) So I have sent the gifts already but I have to send the card and some tags for those presents - so at least I'll be there in spirit. And this child will be expecting an Aunt Tracy card dontchaknow.

Now, I don't have any Tinkerbell stamps. I don't even know if one exists. But the internet is a wonderful thing. I found a cute project online to make a magic wand that has Tinkerbell on it. I briefly toyed with making that magic wand (cos I know this kid would love it but I feared it would be crushed in transit) but decided to use the images to make a card and some tags. For the card I printed out the project itself. The main framed Tinkerbell and a separate star image. I cut those out and glued them together. I added some cardstock that I ran through my Big Shot with a Cuttlebug Swiss Dot Embossing folder. I used some foam tape to pop the main image up. I found a cute font and printed out the sentiment and handcut it to make a banner. And of course I had to add some glitter. In Photoshop I took the image of Tinkerbell herself and printed out a few and ran them through the Big Shot with PTI's Tag Sale #3. They really look cute - and I know she'll love it.
Alright that's all for today. I will be back to show you the graduation cards I made for my daughter. Yes, they're already done. I had to get them done ahead of time as we're heading out of town on Thursday for NYC. What's going on in NYC? Well that is a good question - and I'll be back to tell you :-) (It's "Proud Mom" stuff :-))
Thanks for stopping by. Have a good one!


Tuesday, May 14, 2013

Hello There Fabulous

So last week I was talking about cards being born out of desire to use a stamp set, or an idea you have for a card and then there is the technique you wanna try. Well this one is more in that last range. It's not exactly a technique - more of a media. I was stamping around making some more background "paper" with some Versamark clear embossed images. Little flowers from the PTI Mini Blooms. I'd clear embossed the images and was applying the ink and there was a piece of vellum on my drawing board - from some other card. And I got to thinking I should make some background paper with that - and what would it look like if it was layered on top of the cardstock paper with the same images. So I stamped some little flowers on the vellum and embossed with white embossing powder. I die cut the frame from PTI's Fabulous Frames, put the vellum behind that and layered it on top of the cardstock patterned paper I'd made. I also through on some sequins and used some embroidery floss I had hanging around.
Okay - gotta run - have a good one!

Sunday, May 12, 2013

Happy Mother's Day

I hope you have a wonderful Mother's Day. I'm hoping to get in some crafting time - specifically scrapbooking. But we shall see. In the meantime I thought I'd post this card I made for my Mom.
I was very much wanting to use my Silhouette Portrait. I've been working on using it - for me the learning curve has been big. Everything I want to do apparently isn't just straight up cutting LOL. I did cut some vinyl recently and a lovely little quote is adorning our bedroom walls now. I was very pleased with that accomplishment. (it only took looking at a bazillion videos on You Tube.... ok. I exaggerate a tad. But it took a while.)
So back to the card. Recently the Silhouette store had a lovely 50% off sale on all shapes and I bought a few with my gift card. One was the background you see here in the card. It's actually a card - but I only used the lattice part.  The peony was a freebie - the Silhouette store gives away a shape every week and I gotta say their freebies are pretty fabulous! This flower was so easy to put together - just cut and glue. My kinda flower! The tag is from PTI's Fillable Frames #9 - cut it with the coordinating die and stamped the border on. The sentiment is from PTI's Boutique Borders: Mother. Oh yes - forgot to say the latticey background there is cut from PTI's Spring Moss Bitty Dot patterned paper.
Have a wonderful day!

Saturday, May 11, 2013

Even more cards (I didn't post) LOL

I know... You'd think I would just take the pics of the cards and post them right away but in the last month it just wasn't always possible so here I am with two more cards.
For this first card I had a tough time getting pictures - it didn't want to stay closed LOL.  The second pic will give you a better idea of the diecut feature. The black background is all one piece including the half circle. It was a little tricky getting that accomplished (the partial diecutting I mean) but it was worth it.
I don't know about you but for me -sometimes a card is born from a specific idea of what I want it to look like, or a stamp set that I want to use. But lately it's about techniques I wanna play with. Like in the case here. I was seeing all that ombre out there in the internet card-land. I think it is obvious I'm not too trendy LOL. I'm more of a classic kinda girl. Always have been. But I was liking the ombre. And everything old is new again now isn't it ;-) So I pulled out PTI's Polka Dot Basics stamps set and stamped a whole sheet of cardstock with some of the larger polkas. Oh yeah. In versamark. That was fun (like stamping in the dark!!!) Then I clear embossed those polkas. I grabbed some Aqua Mist ink and that Tim Holtz ink applicator with the foam - I hadn't played with that in quite some time. And I started inking up those polkas from bottom to top and left to right. The important part here is the left to right. Only going in one direction. If you click on the photo hopefully you'll see what I mean. It made the polkas 3D. They have a shadow on the right side and it just pops them right up. (it was a little squeal moment). So I became less intrigued with the ombre (which here is so very subtle) and more so with the 3D effect I was getting. I decided I had to work in a sentiment from PTI's Stylish Sentiments: Birthday and turn my little exercise into a birthday card.

I was going to post the other card but now I'm thinking that's enough for today LOL! I need to get a move on - busy week ahead. Big doings - graduation approaches and a side trip next weekend before the big day - very exciting. I'll tell you all about it soon.
Thanks for stopping by! Have a good one.

Sunday, May 05, 2013

More cards I didn't post

Yes, I have a few more cards I didn't post. And I absolutely meant to do so but what can I say - I got busy. I definitely wanted to post these cos I had such a good time making them. I'd gotten the Stylish Sentiments: Birthday stamp set and saw that little diagonally striped stamp - it's maybe 1/2 inch by 1 inch. I wondered what I could do with it. And I started playing around. With one color then two colors and well here's what I came up with. I really like the way this one came out. I used Aqua Mist and Spring Moss inks and Hawaiian Shores Cardstock - the sentiment (from the same set) is stamped in Fresh Snow ink and I used white embossing powder. In case you're wondering I stamped in one ink in one direction then stamped over that with another ink in another direction and it created this cool pattern.


Then I made a thank you card using the same stamp, inks and technique - different sentiment (Think Big Favorites #3). Obviously I didn't mix the two colors just overlapped the stamping.
Pretty cool what you can make with one little stamp huh?


Oh yeah. Here's that cake I was working on. I had a few issues with the chalice at the last minute. It cracked. And there was actually leaves and grapes and wheat. But no matter. There was a time when I would have absolutely freaked out with things going wrong at the 11th hour. But I didn't. I just got rid of everything but the chalice and host, added the lacey looking frosting and voila. Cake done. And everyone, including the little Communicant, loved it. It tasted great too.


Oh and one more thing. I made cookies. I felt bad that we weren't able to attend the Confirmation for the other nephew last week (the brother of the Communicant). So I made doves - or in this case - Holy Spirit cookies :-)

Alrighty thats enough for the day. Off to make dinner. Have a good one!

Monday, April 29, 2013

Forgot to post

I realized today, while going through some pics, that I have a bunch of cards I haven't posted. So here's one -
I used Papertrey Ink's Cutting Garden. Such a pretty stamp set. I stamped all the images and used a brush and water to give it sortofa watercolor look. Then came back in and stamped over the same images again (this time leaving the ink full strength). I stamped the sentiment on vellum and clear embossed it. 
I've been busy today working on some decorations for a cake. I haven't done any cake decorating in years. I used to do quite a bit but the kids are grown up now and we don't have the same kind of cake spectaculars LOL! Some day I should dig out a bunch of cake pictures and post them. I was a little crazy (in a good way) back in the day when it came to cake decorating. I guess it's just more of that "I like to make stuff" thing. Cake, of course, come with a bonus feature - unlike cards, you can EAT what you make! And I do love me some cake! Anyhow this cake is for a Communion on Sunday (I told you... we have Communions aplenty in this family :-) and fortunately this nephew is somewhat local - only a little over an hour away - yay! so we get to go share in the festivities. ). I dug out the picture of the cake I made for my son for his First Communion and I'm recreating that cake - with some updates. Updates being I'm making the decoration ahead of time in Royal Icing (and not in buttercream like I did 18 years ago - which was crazy). Hopefully I'll have some pics to share by the end of the week. I gotta say I'm having a lot of fun. I'd forgotten how much :-)
Alrighty- thanks for stopping by and have a good one!

Thursday, April 25, 2013

Papertrey Ink Blog Hop: Tilted

This blog hop challenge had me thinking since it was posted 10 days ago. Tilted could mean just about anything, right? I hadn't gotten a chance to make anything for it either in that time. Last night I had just finished putting some new Papertrey Ink stamps away - I put them in their new home :-) and take a long look at them wondering what I'm going to make with 'em. And one of the new stamp sets is called Sketched Shapes. It has a number of shapes but the one that got me thinking was the triangle. I pull out a clear block and slapped that triangle on it and grabbed the nearest ink pad and started stamping to see if what was in my head would transfer to paper. And it did. I had to go to bed (work comes so early in the morning... ugh) but after I got home I gave my idea a try on some typing paper (my stamping sketch paper LOL!) So here's what I came up with: it's three panels wide. I used that triangle and the arrow from Sketched Shapes. I also used a sentiment from PTI's Mini Blooms that I edited, separating it into three parts. When you open the card this is what you see next:


and when you open the card completely here's what  you get:


Blogger is giving me fits right now so I'm closing this up - I'm sending this card to my amazing daughter who is on the verge of graduating from college (illustration major) and I think she could use a pick-me-up right now - weeks to go and a ton of work. Thanks for coming by - have a good one! Oh  yeah.. sorry about the photos. I had a devil of a time getting pics to do it justice!

Tuesday, April 23, 2013

Make it Monday #113 Perfect Pearls


Okay so a funny thing happened on the way to this Make it Monday challenge (using Perfect Pearls or some other metallic powder) - I got distracted with cake.
This is not an unusual occurrence in my life.  I love cake. But I digress (as you, dear reader, know I am wont to do).
In this case it wasn't real cake.
(if it ain't real why bother, right?) I shall explain. I was filling the sugar bowl from the bag of sugar and I was about to throw said bag in the trash and I thought well looky there - right on the bag was a big fat piece of cake. See picture :-)


I thought to myself  - gee that looks about card-sized - the piece of cake. And so I cut away the front portion of the bag and set it aside until today and thought I'm makin a card with this. I cut out the cake and realized I was going to have to mount it on some cardstock (which i did). Then I knew I'd have to cover up that bit of red (the 5lb. circle that's on the right hand bottom portion of my slice o'cake). This is when the card was starting to come together in my head. I needed a big fat sentiment for that generous slice. I used the "Celebrate" from PTI's Think Big Favorites #13. I stamped it in Versamark on Dark Chocolate cardstock. I don't own any Perfect Pearls but I do have Pearl Ex - Micropearl (which looks kinda silvery - I'm just not sure how evident it is from my photo) so I brushed that on. I like how that looked and wanted to repeat the same thing in that problem area (the red circle on the cake). I cut out circles using my circle Nestabilities (Dark Chocolate and Fine Linen cardstocks) and stamped the little "Eat cake" from Cupcake Collection onto the dark chocolate cardstock. (I had to do a little masking to stack the words if you're familiar with that particular sentiment.) I diecut the wee stars from the Super Star Border die and finally I cut some Loop De Loop borders out of Fine Linen cardstock and attached those to the top and bottom of the card. 
So that's the story of my little mocha birthday card -it kinda looks like mocha doesn't it.... some kinda chocolate regardless - and in my mind all good birthday cake has some chocolate in it. Thanks for stopping by. Now go eat some chocolate cake for me!

Sunday, April 21, 2013

On your Confirmation

okay so my last post was for a First Communion card. Now we're on to the Confirmation card for the brother of the recipient of that card.... did you get all that? LOL Now that lovely set I used on the Communion card has a sentiment "Confirmation" which is nice. But the images don't really reflect Confirmation. So... what to do. Gotta make my own. So here's what I came up with - the Holy Spirit :-). I just drew a dove and cut it out.


 I knew I wanted to try a few different things with that shape. I tried watercoloring with watercolor crayons then went back to the shape alone. Then tried using a little Pearl Ex to give that shape some shimmer. Finally I just came back to the shape itself (oh yeah just the dove not the haloed area). I ended up using a circle Nestabilities die to cut the circle in PTI Lemon Tart cardstock and mounted that on some PTI Spring Rain cardstock(and then a card base of white). I used some 3M foam tape to pop that dove up a bit. I added the "on your" with a Micron pen. And voila. Confirmation card done. Which is a good thing cos that little event is this week - I'd mixed it up with the Communion (which is the week after.)  I kept my original drawn cut out dove - he's tacked to my bulletin board so I can use him again next Confirmation LOL! (unless somebody comes out with a die I can use in the meantime. Wouldn't that be fine :-))
Okay thanks for visiting - have a good one!


Wednesday, April 17, 2013

First Communion

I have been looking for years - really - for a First Communion stamp set. I've seen some ok ones but nothing I was willing to spend some money on. So every time I had another First Communion in the family to celebrate (and there have been mmmmmmaaaaaannnnny) it pretty much killed me to go to the card store - but go I did. As recently as last month - a nephew celebrating First Communion and Confirmation all together. Right after that I happened to be looking at Marybeth's Time for Paper blog and saw her post of a Communion card. The stamp (from Serendipity Stamps)was perfect and I said "sold"! So here's my card (as there's another Communion coming up next week :-))
I colored using Copics for everything but the chalice. I tried a number of gold pencils to color in that chalice but I couldn't get the gold I wanted - so I finally used a silver Prismacolor pencil and mineral spirits. I used a Nestabilities die to cut out the image and stamped the "First Communion" sentiment from the set. The "on your" is just my handwriting with a Micron pen. I stamped out a bunch more of these images needless to say - so I could make more cards for the next First Communion. (After I hit the stamp store to get a refill on my one butter Copic pen........LOL) Thanks for stopping by. Have a good one!

Sunday, April 14, 2013

Make it Monday #111 Take 2!

I know - another challenge card... yay for me!Yesterday afternoon I was trying out PTI's Beautiful Butterflies - finally. Life has been busy and I had to put it aside for a little while. Regardless I have a birthday card to make for a particular girl - and I thought the butterflies would make her smile. I had embossing powder still on my drawing table (with a million other things.... but I digress...) so I started stamping and embossing. For the butterfly panel - I initially stamped a few butterflies in Versamark then watercolored using the Sweet Blush reinker - leaving the white butterflies. I set that aside until this morning. Then I stamped again in Versamark and watercolored using the Hibiscus Burst reinker - leaving some sweet blush colored butterflies. I think you'll have to click on the photo to see the detail. I diecut the one large butterfly using cardstock and vellum and stamped on the vellum (with Raspberry Fizz ink) then clear embossed it. (The polka dots are from Polka Dot Basics.) I glued the two butterflies together added a button with some embroidery floss and the little attenae are some paper jewelry cord. I grabbed 2 more buttons, added floss and attached them to the sentiment - which is from Stylish Sentiments: Birthday. I originally planned to stitch on both sides of the panel - but my sewing machine had other ideas (rrrrr). However, my recipient won't be any the wiser :-)
Have a good one!

Saturday, April 13, 2013

Make it Monday #111: Watercoloring Embossed Images

So this week the Make it Monday Challenge is to watercolor embossed images. I thought that would be some fun since I seem to be embossing everything I get my hands on lately. The hard part was to decide what I wanted to watercolor. Then I realized it wasn't so hard to decide after all - I can't seem to get enough of the Year of Flowers: Morning Glories stamp set from PTI. I stamped the flowers in Versamark then embossed with White embossing powder. I used reinkers to color in the the flower and leaves with a water pen I had on hand. There was a point where I thought I had those leaves dark enough - left it to dry and when I came back it had dried a lot lighter. But I decided against going back in and trying to get a little more definition. I really liked the way the flowers came out and decided to quit while I was ahead ;-) On to the rest of the card! I took the sentiment that comes with the set and did some masking so that I could have one line at the top of the card and the remaining line at the bottom. I stamped both in PTI Fresh snow and embossed with White EP - at the bottom you'll note I stamped on vellum that I'd diecut with PTI's Small Scallop Border Die.  Now for that Lemon Tart (yellow) center area - I decided to use the Polka Dot Basics stamp set. I wanted a subtle background so I stamped in Fresh Snow then used Clear Embossing Powder.  I did try Versamark - Clear embossed but that created a dark dot which is not what I was going for - the white clear embossed polka was just right.  Finally I used foam tape to pop up the image.
Alrighty- I'm off to make the most of this beautiful Saturday. Hoping to get in some more stamping for sure! Have a wonderful day!

Thursday, April 04, 2013

Birthday Fox

You wouldn't know it but I've been making all kinds of cards but haven't had a chance to post. But today, before I get back to it (the card-making), I thought I'd post one quick. I used Papertrey Ink's Hello, Foxy stamp set (and die) for that ridiculously cute fox,  along with the Wonderful Words: Birthday die and sentiment stamps ("Happy" and "To You. From Me. With Love.") from Mini Blooms. Oh yeah - also the leaves from Turning a New Leaf stamp set. Those leaves are either clear embossed or embossed with white EP. The fox was colored with Copics.
Okay - I need to get back to making stuff.  :-)
Thanks for stopping by!
edited to add: I forgot to mention I used the PTI Woodgrain Impression plate on the "bIRthDaY" 

Wednesday, March 27, 2013

It's all about the carrots

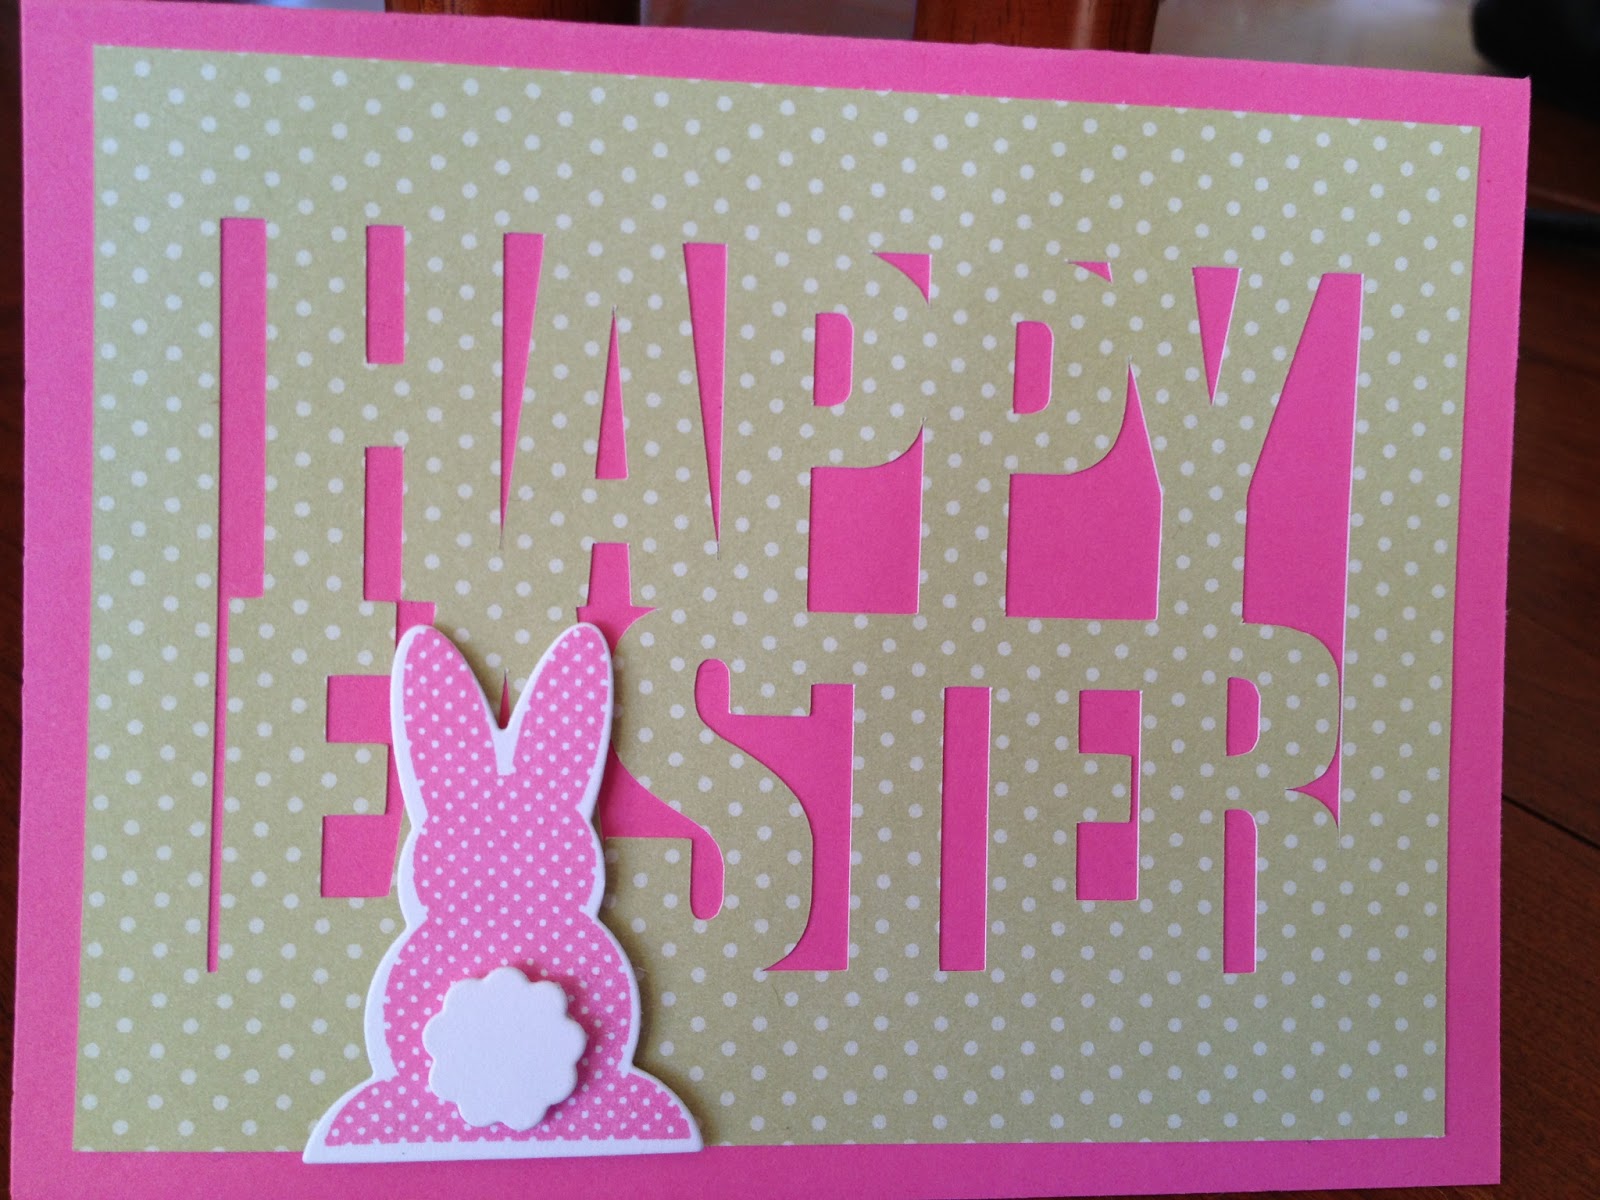
well... and the bunny. he's cute isn't he? I was (an am still) in need of a few more Easter cards. I pulled out a set - Easter Bunny by Impression Obsession - I bought a few years ago and set out to make something with it.

I don't know about you but I find I buy stamps, hoping to get a lot of use out of them - I try not to impulse buy - and not a lot that's trendy... not to say that I don't have some "trendy" things in my collection but I'd say it's more classic.. stuff I know that when I bring it out again it doesn't look dated. (of course this is debatable ... depending on who you're talkin too ... but I digress....)
So I pull out these Easter bunny stamps and this is what I came up with. I really like those carrots. There are 2 carrot stamps in the set and I used them both and I think they make such a cute little border! I used Copics to color Mr. Bunny and carrots etc. The polka dot patterned paper is from Papertrey Ink's Polka Dot Parade pack. I used a rickrack die from PTI as well as Oval Nestabilities (with accompanying scalloped oval). The bakers twine is WeRMemory Keepers. Oh the little Happy Easter sentiment is from PTI's Polka Dot Parade #1 stamp set. Have I left anything out? Oh yeah... the little tag. I didn't have what I was looking for so I used the Double Ended Tag Trio from Nestabilities that I've had for a few years - and cut off one end and rounded it off.
Ok. I need to make another Easter card and a few birthday cards too. Thanks for stopping by!

Sunday, March 24, 2013

Papertrey Ink Make it Monday #108: Inked Backgrounds

The MIM challenge this week was Inked Backgrounds. I love stamping backgrounds and inking backgrounds. I played around all week long in stolen moments. I have some backgrounds I'm actually saving because I haven't formulated the rest of the card in my head LOL! In the meantime, on Friday afternoon I got home from work and my box from PTI had arrived and I really wanted to try out the Year of Flowers: Morning Glories set. I have had that set on my little wish list for forever. I love morning glories. A few years I had them growing up around my mailbox - they are just so beautiful. Anyway - I did have a dilemma - I didn't have the Copics I needed to color them (gasp!). I did have some prismacolor pencils but I had my mind set on markers. I decided to hit Michaels as they've recently been carrying them. Well - they didn't have what I needed. I noticed American Crafts Chromatix - the colors looked right so I gave them a try. I stamped out the image a few times and dove in. I'm not sure I'm a complete fan - but I think they worked ok. The greens are Copics. But let me tell you about the background. It's simple but I kinda like it. I used Background Basics: Tin Types. I stamped it with Versamark on white cardstock and then clear embossed it. I applied Fine Linen ink first then I went back in and layered on some Kraft Ink. The sentiment is from Fillable Frames Sentiments stamped on the Double Ended Banners die. Then I decided to add a little butterfly from Beautiful Butterflies stamped in Versamark and clear embossed. (I originally considered doing another background instead of the butterfly but I was afraid it was going to get too busy).  Alrighty - that's all from me right now. The kitties are begging for dinner and the people food is about to come out of the oven! Have a good one!

Friday, March 15, 2013

Still too busy for my likin

Yes things seem to get in the way of my card making. Work, laundry, cooking blah blah blah. We did go away last weekend to visit my eldest nephew and his wife. That was so fun - you know how it is sometimes - nothing will do but to just get on the road and getaway! We did a lot in a short little visit: went to see their new house they'll be closing on at the end of the month; went out to lunch; went bowling (I haven't done that in yearsssss and we had a ball... a bowling ball LOL), went to the movies (saw Silver Linings Playbook - so good!),went out to dinner. I'd always wanted to go to this fondue place - The Melting Pot (have you been?) and when they suggested it I was so in. Yum. (yes it was a fattening weekend but that's all I shall say on that subject.)
Anyway - you go away and then you need to catch up with everything you put aside for the weekend. (Laundry, grocery shopping... did I say laundry? ugh). I've been so busy I haven't even stamped with some new Papertrey Ink stamps I bought in February - unheard of for me. I find a way to get ink on stamps within days of receipt. And heck - Santa bought me a Silhouette Portrait for Christmas I'm still trying to get a handle on. So the other day I said I'm pulling out something and I'm stamping and I'm Silhouetting.
On the first card I used some burlap I had hanging around for years combined with the green burlap I picked up in Michaels a week or two ago. I diecut the letters with some Sizzix dies (Funky Brush) out of PTI Hibiscus Burst Bitty Dot patterned paper. I think I love those diecut letters alot all polkadotted up. The little bunny is stamped and diecut from PTI's Polka Dot Parade #1. The word Happy is from PTI's Stylish Sentiments. The buttons are also PTI. And the Bakers Twine is from WeRMemory Keepers. I love that little bunny so much I decided to pair him up with a card I cut using my Silhouette Portrait. The patterned paper is again PTI but this time Bitty Dot  Spring Moss. It's a simple card but I like it and I was happy to actually produce something using the Silhouette. I had gotten a bit frustrated with the Silhouette - it's not the Silhouette that's the problem - it's me. I need more time to play with it and finally getting something made was encouraging.
SSo that's all for now. I'm determined to get some more cards made on Sunday (yes tomorrow is already spoken for - ugh!). Thanks for stopping by and have a good one!

Thursday, March 07, 2013

Have a little cake with your candles

is another way of saying - you're old! Considering the card-ee (recipient of said card) - I can say this - I'm older than her. My little sister shall be celebrating a big birthday in another month and since I'm the older sister I can say this kinda thing, right?
What precipitated this card? Well I was looking at the Moxie Fab blog (which I've been so enjoying! Love all the fun posting of images etc) and Cath Edvalson has been showing the 11th edition of Card Creations - and along with it - posting challenges all week. The Speech Bubble Challenge caught my eye. The little sentiment I came up with is a derivation of many things we used to say in our house growing up. For example: there'd be a LOT of whipped cream plopped on a piece of pumpkin pie and someone would say - "hey, have a little pie with your whipped cream". Or maybe a lotta of hot fudge on the ice cream "hey, have a little ice cream with that hot fudge". See what I mean? 
Of course I don't have a stamp for that little sentiment, and I didn't have a birthday cake stamp with a whole mess of candles.... so I made my own. I drew my card - probably not kosher ? for the challenge but I did use some Copics to color it in and mounted it on some Papertrey Ink Berry Sorbet cardstock. Maybe that'll count. I don't know if there are rules for such things. Heck I'm entering it for the challenge anyway!
It's the first card I've been able to make in a week. I've been busy. First addressing wedding invitations for an old friend of mine. Her daughter is getting married and she wanted my handwriting on the envelopes (go fig. She hates her handwriting and loves mine.) That took a week. Lots of envelopes - inner and outer. Oyvey! I've addressed "Save the Dates" for a niece (she also likes my handwriting :-)) but wedding invitations were a whole 'nother level yaknow?
We also bought me a new car the other night. Yes! I have had my van for 13 years and now that we've made our last college tuition payment - time for Tracy to get a new car. To say I'm a happy girl is a bit of an understatement.
Okay. I need to get on making dinner. Thanks so much for stopping by! Have a good one!

Monday, February 25, 2013

a couple of birthday cards

I forgot to post. Amidst the flurry of valentines, I realized I never got around to these two cards. I really wish I had taken better pics. I admire all the fine photography on others blogs. Improvement on my picture taking was at the top of the list for this year - that and learning Photoshop. But I still struggle with sneaking in time for card making. Well - it's early - we're only at the end of February right? Okay I've got two cards.
First one I used Papertrey Ink's 2012 Birthday Tags and Giga Guidelines stamp sets. I also used PTI's Limitless Layers Ovals and Tag Sale #3 dies and an embossing folder from StampinUp!.
The next card I used a Papertrey Ink stamp set called Cupcake Collection for the cupcake and sentiment as well as the background candles. (I lined up the little candles on my acrylic block and just kept on stamping to create the background.) The polka dot background was stamped with PTI's Polka Dot Basics stamp set. The cupcake was cut with the coordinating dies. And the frame as well as the little banner are dies from PTI's Fabulous Frames die set. I finished it off with some ultrafine glitter.
Okay that's all from me right now. Gotta run! Thanks for stopping by.


Wednesday, February 20, 2013

Make It Monday #104 : Handmade Pinwheels

On Sunday I was playing around with some Papertrey Ink stamps - stamping on a sheet of Guidelines I Grid cardstock with my Giga Guidelines Stamp set. It's been a while since I played with this set and I wanted to make a birthday card. I stamped the entire sheet with one of the stamps from the set using Melon Berry ink. I played a bit with another color and tried adding in another stamp to the mix - then I had to call it a night.
On Monday I got home from work and viewed the Make It Monday this week and I thought - this sheet of stamped images is the perfect starting off point for making a pinwheel (and my birthday card). Here's the card I came up with - I added a square of Aqua Mist Gingham patterned paper behind my pinwheel and an aqua button with some floss. The sentiment is from Think Big Favorites #7.  I did make another pinwheel using some more images from the sheet and I'm hoping to make another card using it.
Oh I forgot to say I clipped my card to a cute little stand my sister made me for Christmas - so that's what you're seeing in the photo of my card. I've been using this little stand since Christmas to clip recipes up while I'm cooking and cards I want to look at after I've made them. Okay... thanks for coming by!

Saturday, February 16, 2013

9th Annual Valentine Rakarama!

 So it took me a little longer to get back here to post these but I wanted to wait until the recipients had their Valentines.  Every Valentine's Day, I like to make valentines for my crafty girlfriends. For the past few years I've challenged myself to make every one different. Well - the basic layout is the same but I think you'll see they're kinda like snowflakes - not one is the same ;-) So on with the show...


Supply wise I used the My Minds Eye Love Me 6x6 paper pad, Papertrey Ink Framed Out #11 Die, as well as PTI's Limitless Layers 2-1/4 Heart dies and Heart and XOXO Border dies and my sewing machine. Alrighty that's it for today. I still have some family/friend valentines to show and a few other cards I haven't posted yet. Have a good one!